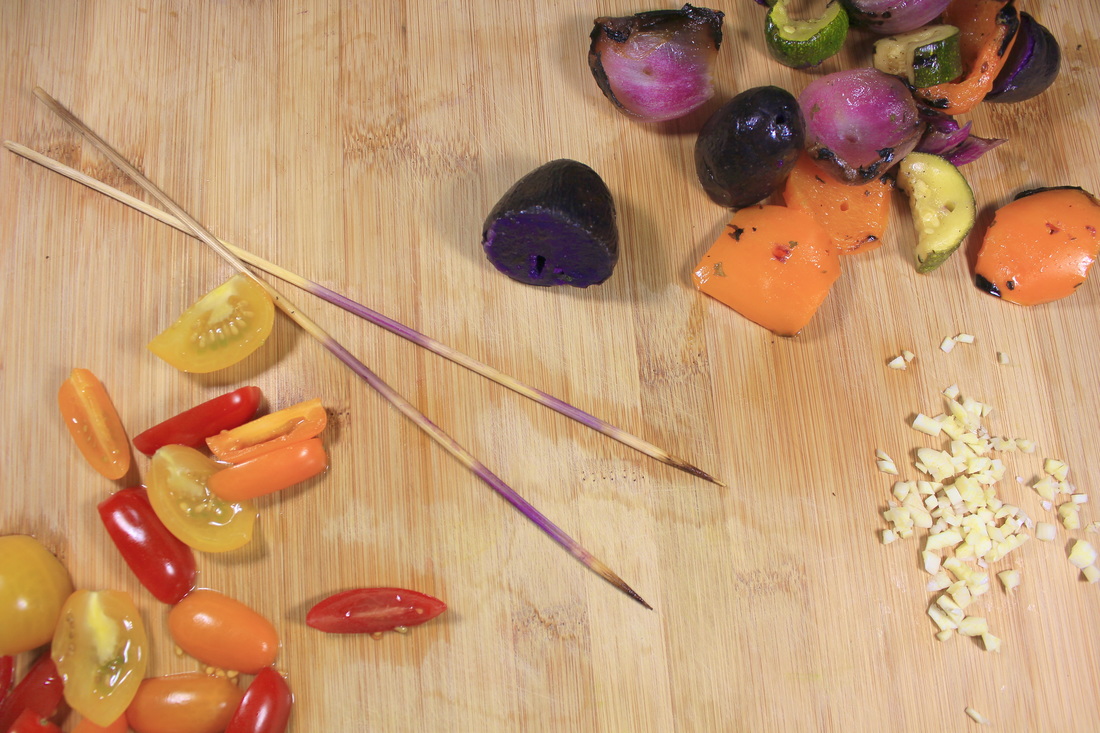
 Hello from Atlanta!! As most of you know, Sterling and I moved from Chicago to ATL last week. He received a promotion (woop woop!) about 6 weeks ago, and it brought us here. I'll be doing a little blog post about the move in the next coming days... right now let's focus on the food. Memorial Day was this past Monday. Sterling grilled up some chicken, burgers, and hot dogs on the balcony, and I made mac & cheese, creamed corn, baked beans, and veggie kabobs. We had a few new friends over, drank a few drinks, ate a few plates of food, and lounged by the pool. Summer is approaching (allegedly it's not actually summer yet, although this Atlanta HEAT is telling me otherwise), which means cookout season is upon us. One of my new goals is to be more conservative with the amount of food I waste, striving to make meals solely with what I've got in the fridge and pantry. Back in Chicago, we were around the block from a grocery store, so I literally stopped in every day after work to pick up ingredients for dinner. It was expensive and wasteful. So, in the light of conserving food and embracing cook out season, I came up with this quick and easy pasta idea that uses leftover veggie kabobs. This may come as a surprise to you, but veggie kabobs are usually the last to go at a cookout, so there are usually plenty of skewered leftovers. Add 'em to some whole grain pasta with sautéed garlic and tomatoes, and you're good to go. It aint fancy, but it's delicious, quick, and practical. 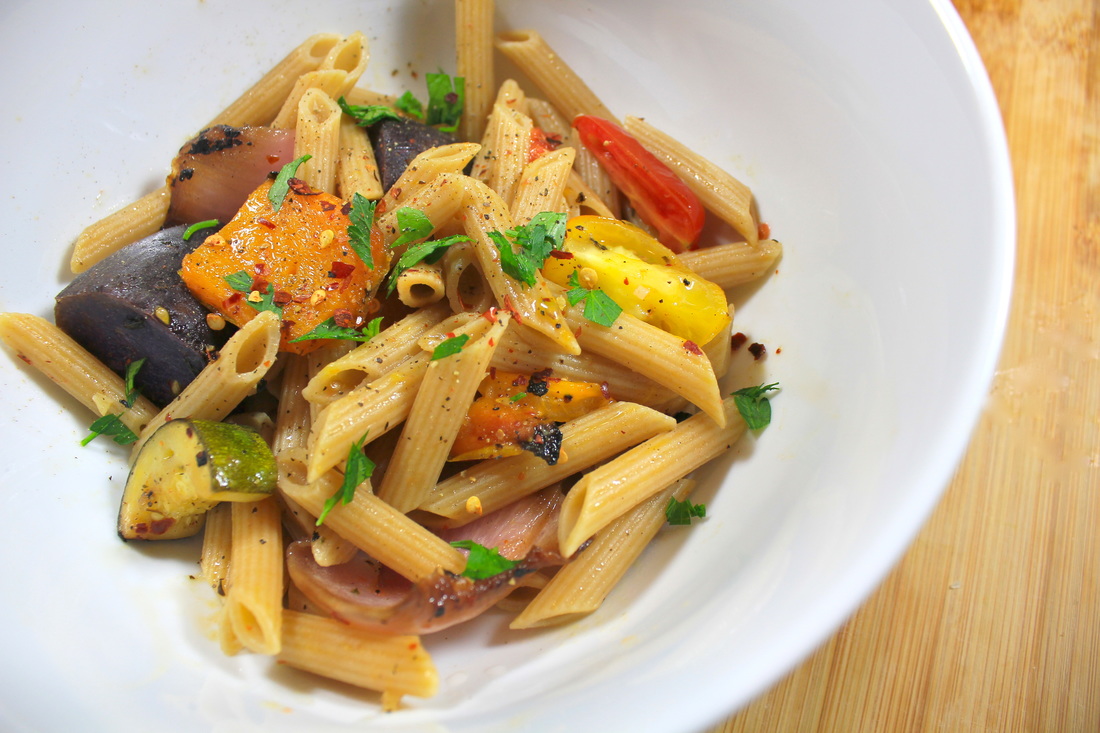 Serves: 2
Cook time: 15 minutes Ingredients: • 8 oz whole grain pasta • 2 veggie kabobs, removed from skewers (should yield about 1 heaping cup of veggies) • 1 garlic clove, minced • 1/3 cup cherry tomatoes, quartered • Salt and cracked black pepper to taste • Quarter tsp garlic powder • Half tsp crushed red pepper flakes • 1-2 tbsp olive oil Optional toppings: chopped italian flat leaf parsley, basil, sun dried tomatoes Directions: • Cook pasta according to package instructions, drain and set aside • Heat 1 tbsp olive oil in skillet and add leftover veggies until heated through • Add garlic and crushed red pepper flakes. Cook until fragrant, about 1 minute • Add tomatoes, stir, and cook for another 1-2 minutes, until tomatoes have softened without becoming mushy • Stir in pasta, season with salt/pepper and garlic powder, and drizzle with remaining olive oil, as desired • Finish with optional toppings of choice and serve hot!
2 Comments
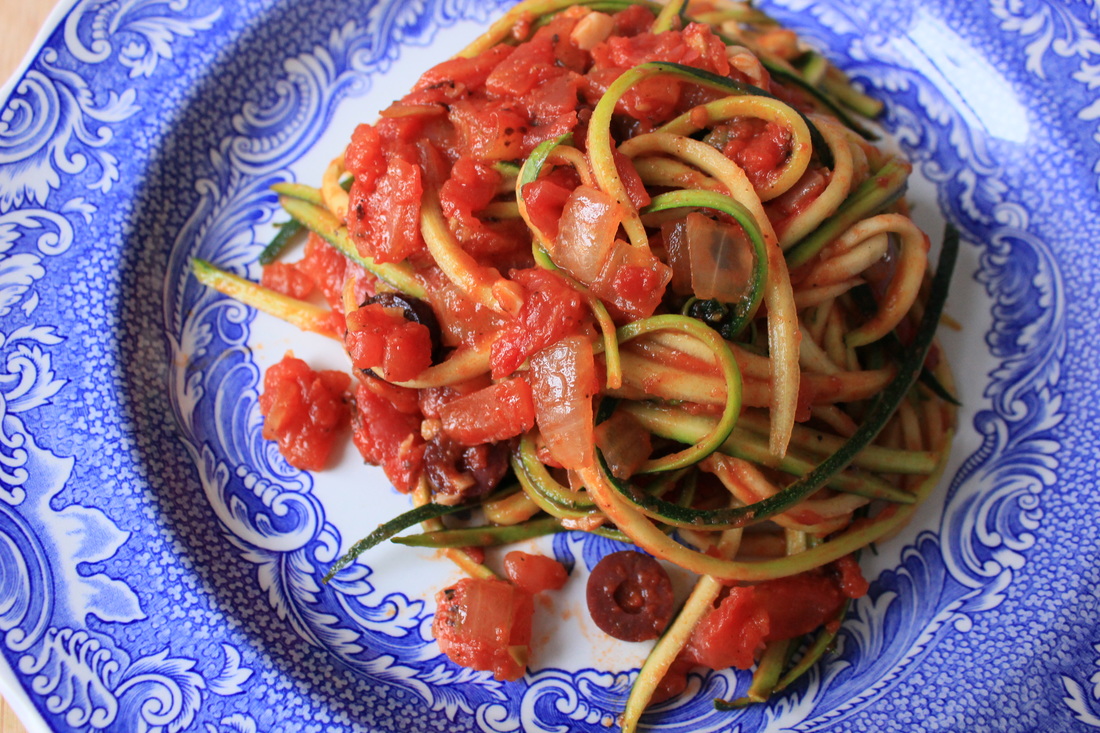 When I was in high school, I went to the same restaurant for lunch every thursday. I always sat in the same booth, and I always ordered the Penne Puttanesca. I love the tangy tomato sauce with the salty capers and the briny olives. I would smother my pasta in parmesan cheese and finish the leftover sauce by spreading it onto half a loaf of french bread. Now, while I will not sit here and pretend that I don't do the exact same thing when I go out to eat now, I will say that I have lost my teenage metabolism and do strive to lighten it up now and then. This puttanesca that I present to you tastes almost exactly like that dish I remember so fondly- only it is carb and anchovy free. Which means that now I can eat that half loaf of french bread without thinking twice.
I know I previously said that I don't consider zucchini noodles to be an adequate substitute for pasta, but I was wrong. I was so wrong. Today I've learned that it's all about the sauce, man. I've made a pretty vast range of sauces to cover my zucchini noodles in the past- alfredo, creamy red pepper, lentil marinara, pesto- and while it all tasted good, it just never felt as satisfying to me as a big ass bowl of pasta. I do not know what the difference is here today, but I have half of this puttanesca left over and I am so satisfied that I am actually leaving it for my lunch tomorrow. It's salty, briny, tangy, spicy, texturally pleasing, smells amazing. I dunno. It just works. It is really damn good, and I am so excited to share it with you. Serves: technically makes 4 servings, but it's zucchini which means it's less filling than real pasta so let's call it 2 servings, shall we? Cook time: 10 minutes (no joke) Ingredients: • 3 zucchini, julienned. (as mentioned in my last zucchini noodle post, you'll only want to use the firmer parts. stop peeling once you've reached the seedy, softer center) • 14.5 oz diced tomatoes (I use the "fire roasted" flavor) • 1 tbsp tomato paste • 2 garlic cloves, minced • Half a large sweet or white onion, diced • 1 1/2 heaping tsp capers • 2 heaping tbsp kalamata olives, sliced thinly • 1 tbsp olive oil • Salt and pepper to taste Optional toppings: red pepper flakes, fresh basil, shaved parmesan Directions: • In a nonstick skillet, heat olive oil over medium-high heat. Once hot, add onions. Season with a pinch each of salt and pepper. Cook until onions are translucent, stirring occasionally. • Add garlic and tomato paste and stir to combine. Cook until garlic is fragrant, about 1 minute. • Add diced tomatoes, and heat for a minute, stirring occasionally. Then add olives and capers, and stir to combine. Let simmer for 1 minute. Taste and season with salt and pepper, as needed. • Next, add the zucchini in bunches. It'll seem like too much zucchini at first, but as it cooks, the zucchini will release its' moisture and get smaller. Keep adding and stirring continuously until all of the zucchini has been incorporated. Cook for another 30 seconds to a minute, or until all of the zucchini is coated in the sauce and heated through. It should still have a bite to it. • Remove from heat, top with desired optional toppings of choice, serve hot, and enjoy :) 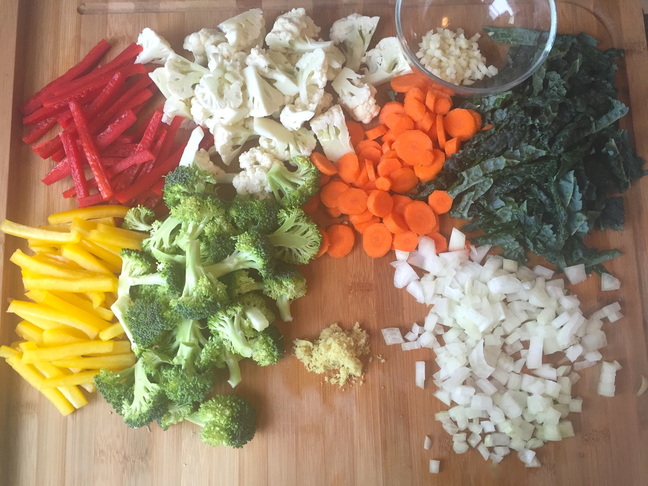 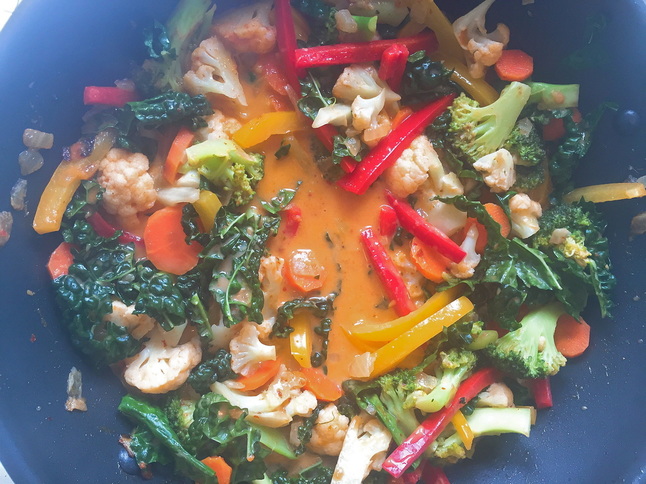 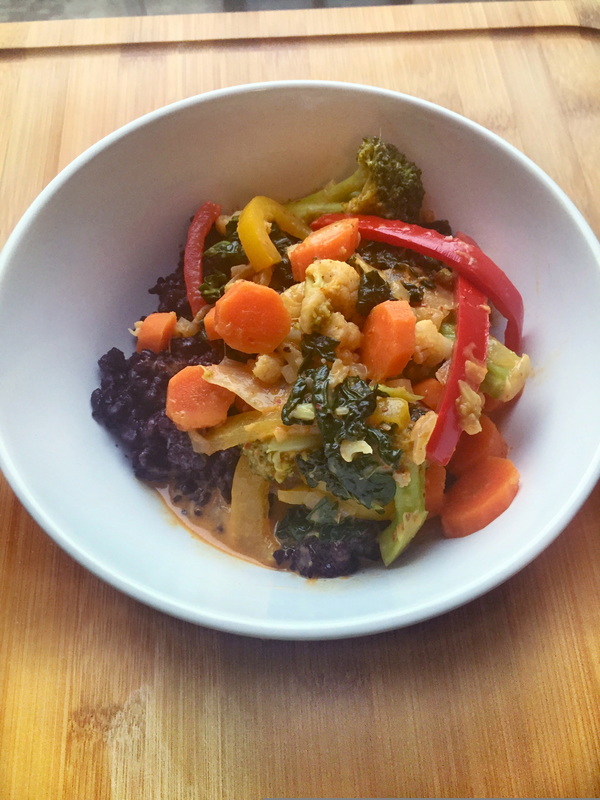 Warm and comforting, hearty and healthy. Mostly savory, but a little sweet and a little spicy. It's everything you need, really. I made this as an extension of Cookie & Kate's recipe, and it was delicious. I added some heat, a few extra veggies (I post way too much broccoli on this blog), and served it on top of a big bed of black rice- which allegedly contains more antioxidants than blueberries, fun fact. Another fun fact, I cannot make rice to save my life. It's always either over cooked or under cooked. My mom actually bought me a rice cooker for Christmas- it's that bad. Sterling can attest. So, if you want to learn how to make rice, please google it, because I really just cannot help you, I'm sorry. The rice you see up top turned out pretty good, but that was a fluke and I don't trust myself to tell you how to replicate the process. So sorry, love you forever.
Anyway! If you want to make this with meat, just add chicken to the pan before adding the veggies, cook until outsides are browned, but not cook through. Then proceed according to the rest of the instructions and let simmer until chicken is cooked through. Or, if you don't eat meat, and want to share this meal with someone who does, just make the chicken in a separate pan by sautéing bite sized pieces in some garlic and curry paste. Top the veggie curry with the chicken and your dinner guest will be good to go! Ingredients (makes approx. 4 servings): • 1 cup rice of choice • 1-2 tbsp coconut or olive oil • 1 small white onion (diced) • 1 tbsp freshly grated ginger (or the tubed kind!) • 1 cloves garlic (minced) • 1 red bell pepper (sliced in thin strips) • 1 yellow bell pepper (sliced in thin strips) • 3 carrots (peeled and sliced diagonally into 1/4" rounds) • 1 cup broccoli florets • 1/2 cup cauliflower florets • 1 cup lacinato kale (cut into thin strips, ribs removed) • 3 tbsp Thai red curry paste (I strongly recommend using this brand) • 14 oz full-fat coconut milk (there are several brands of coconut milk with lots of additives. the only ingredients you should see are: coconut, water, and guar gum) • 2 tsp coconut sugar • 2 1/2 tsp low sodium soy sauce • 1 1/2 tsp rice vinegar • 1/2 tbsp ground red pepper • Basil for garnish (strongly suggested! didn't have on hand when I created this post) Directions: • Cook rice according to instructions from someone else (see note in first paragraph of post) • Heat a large skillet with deep sides over medium heat. Once hot, add 1 tbsp of oil, onions, and a pinch of salt. Cook until onions are translucent, about 3-4 minutes. Add garlic and ginger, and cook until fragrant, about 1 minute. Stir continuously. • Add 2 tbsp of the curry paste and stir to combine. Cook for about 30 seconds, allowing the paste to soften up and become fragrant. Note: if cooking with chicken, you would add the meat at this stage and cook until browned, but not cooked through, then add veggies and follow remaining steps, allowing broth to simmer until chicken is fully cooked • Add broccoli and cauliflower and cook until veggies are tender and broccoli is bright green. The broccoli should still have a slight crisp to it. You may need an additional tbsp of oil. • Add peppers and carrots, and cook for about 3 minutes, or until tender, stirring occasionally. • Add remaining tbsp of curry and stir to combine • Add coconut milk, 1/4 cup water, kale, and coconut sugar, and stir to combine. Adjust heat to bring liquid to a low simmer, and cook for 5-10 minutes, allowing all of the flavors to come together. Note: if you are using canned coconut milk, there will most likely be a thick layer of coconut cream on top. Just blend this into the coconut water at the bottom of the can before adding to the curry. • Remove from heat and add rice vinegar, soy sauce, ground red pepper, and a pinch more salt (if needed) 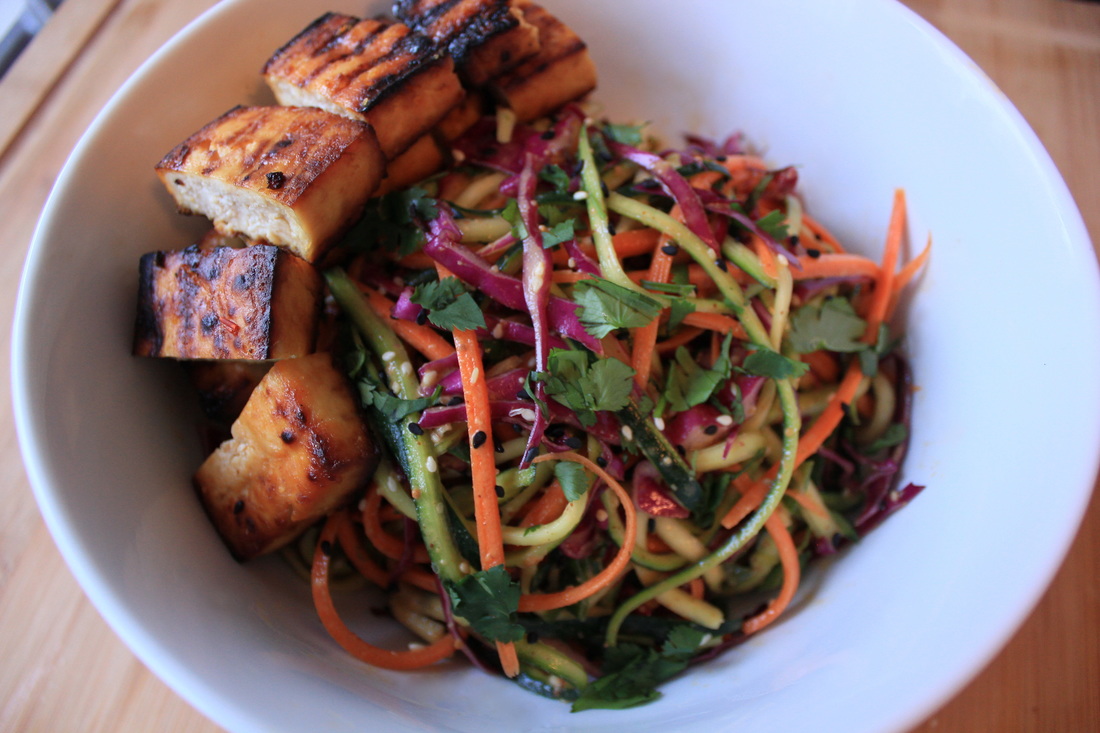 Off the bat I will let you know that you'll need a julienne peeler for this recipe. They're only like 10 bucks for a pack that comes with both a julienne peeler and a regular peeler, so it's well worth the investment, IMHO.
So, zucchini noodles. I'm gonna keep it real with you and admit that I do not consider zucchini noodles, or zoodles, to be a great substitute for pasta. At the end of the day, it's a vegetable, and it will never have the carb-y caress of a real noodle. But, as a salad, I am fond of zoodles. My favorite salads are crunchy and colorful, and using zucchini and carrot noodles is a great way to achieve this. I used a nut butter based dressing for this salad. It's creamy and zesty, and pairs perfectly with the sweet & spicy tofu. The tofu is first seared on a grill pan for about 5-7 minutes, to give it those nice grill marks, and then cooked under the broiler for about 16-20 minutes. The long cook time helps to remove the excess moisture in the tofu, leaving with is a crispy, meaty lil nugget that makes this salad a filling, satisfying, and delicious meal. For real- I was sad when it was over. Ingredients: Noodles: • 2 1/2 zucchinis, julienned Note: you only want to use the firmer, meatier part of the zucchini. 3 peels per side will get you right to the softer, mushier core, which is the part you don't want to use. I know, I know. It feels very wasteful. You can save the core for homemade veggie broth, or add it to a smoothie (it has no taste). • 3 large carrots, julienned • 1/3 cup red cabbage, thinly sliced • 2 tbsp cilantro, finely chopped • 1 1/2 tbsp green onion, thinly chopped • 1 tbsp lime juice • 1 1/2 tbsp almond butter or peanut butter • 1/2 tbsp honey • 1 tsp sesame oil • 1 tsp chili paste • 1/2 tsp soy sauce • 1 tsp rice vinegar Optional toppings: black and white sesame seeds, chopped peanuts Tofu: • 6 oz extra firm tofu • 1 tbsp honey • 2 garlic cloves, minced • 1 tsp ginger (freshly ground or tubed.. both are fine) • 1/2 tsp sriracha (or more, depending on desired level of spiciness) • 1/4 tsp lime juice • Pinch of salt Directions: • Cutting across the shorter length of your block of tofu, cut 3/4" thick slices. Place slices on a napkin or paper towel, and pat dry. • Add all tofu marinade ingredients to a bowl, and stir to combine. Add tofu, flipping to cover both sides, and let marinate for 15 minutes. Make sure to save the marinade for later. • Add carrots, zucchini, and cabbage to a bowl. Mix your nut butter, honey, sesame oil, chili paste, soy sauce, and rice vinegar in a separate bowl and set aside until ready to serve. • Heat grill pan over high heat and spray liberally with non-stick cooking spray. Once hot, add tofu and let sear for 3-4 minutes per side. Shift the tofu after a couple of minutes on each side, to keep it from sticking to the pan Note: if you don't have a grill pan, you can sear the tofu in a regular skillet • Adjust your oven rack to 8 inches below your broiler. If your oven gives you the option of low or high (mine does not, so no worries), keep it on low. Mine's super hot but it worked out just fine. • Place tofu on a greased baking rack and place the rack on a lined baking sheet to catch the drippings. Cook the tofu under the broiler for 8-10 minutes on each side, or until the tofu is golden brown, and the edges are crispy. Assuming your uncooked tofu was a 10 on a scale of 1 to tender, the center of your tofu should now be at a 6. Be sure to rotate your baking rack every few minutes, to get an even cook. • Remove the tofu from the oven and brush the top with the remaining marinade. Place back under the broiler and cook for another minute or 2, until the glaze has caramelized. • Remove, let cool, and cut into bit sized pieces. Dress your salad, top with your tofu, and enjoy! 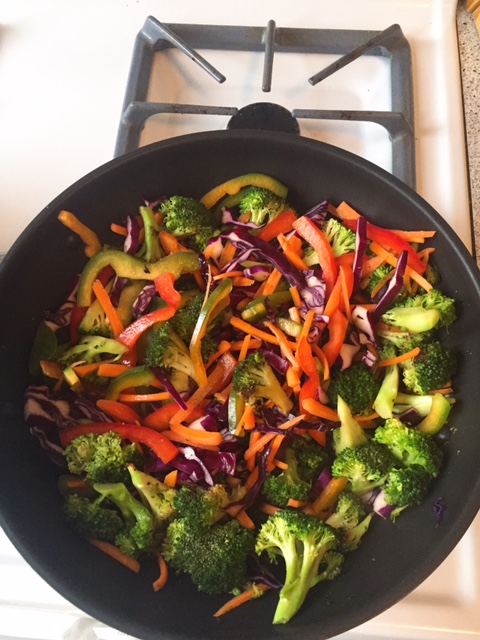 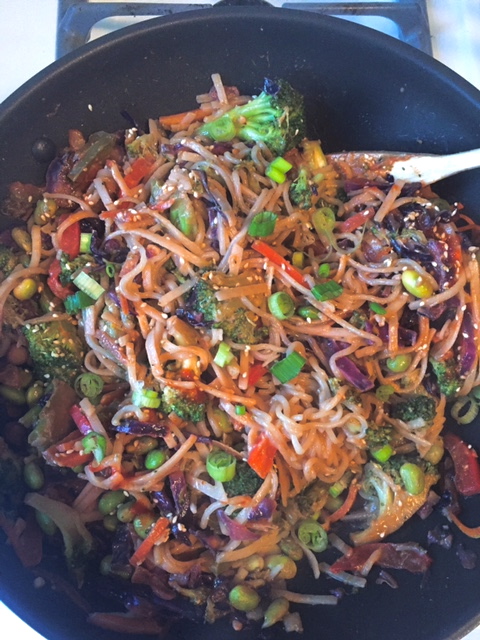 Stir fry is one of my favorite week night dinners to make. It's quick, easy, healthy, and a great way to use up almost any leftover veggies you've got in the fridge. I'd say the two keys to making a good stir fry are 1) keeping just the right amount of crispiness in the veggies, and 2) the SAUCE. After experimenting with dozens of stir fry sauces, I can confidently say that THIS one is perfection. It's creamy, savory, and bright, with a hint of spice. After adding it to the noodles, I can usually be found scraping the remaining sauce out of the bowl and spooning it into my mouth. No judgment.
This stir fry also goes well with shrimp (if you're into that, which I am not, but Sterling is), so I'll give you the ingredients for the quick marinade I like to make for the shrimp, and how to prepare them. This is my ultimate number one favorite stir fry that I've made to date. It's so colorful, vibrant, quick to make, and deeelicious. I think it'll be your favorite too. Ingredients (makes approx. 4 servings): Noodles: • 10 oz stir fry rice noodles (I like this kind from Thai Kitchen) • 1-2 tbsp coconut or olive oil • 1 heaping cup broccoli (cut into florets) • 1/2 cup cauliflower (cut into florets) • 1/2 cup red cabbage (sliced) • Half large red bell pepper (sliced) • Half large green or yellow bell pepper (sliced) • 3 large carrots (julienned and cut into 1-2" slices) • 1/3 cup frozen edamame (thawed) • 2 cloves garlic (diced) Sauce (increase by 1 unit per ingredient if you like it mo' saucy) • 2 tbsp creamy peanut butter • 4 and 1/2 tbsp low sodium soy sauce • 2 tsp sesame oil • 1 tsp sriracha (or more, to taste) • Half tbsp fresh ground ginger (or the tubed kind) Shrimp I use the large frozen ones, shelled and deveined. Since I'm only ever making the shrimp for Sterling, I typically make like half a pound, give or take, so please adjust your marinade ingredients accordingly. In any case, you don't need a lot of marinade, just enough to mostly cover the shrimp. Marinade • 2-3 tbsp low sodium soy sauce • 1/2 tsp garlic powder • 1 tsp sriracha Optional toppings: Toasted sesame seeds Sliced green onions or scallions More sriracha Directions: Noodles: • Cook rice noodles according to package instructions, and prepare sauce (by whisking all sauce ingredients together) for later. • In a large skillet with deep sides (I use a small wok... That I own.....), heat 1 tbsp oil over medium high heat. Once hot, add broccoli, cauliflower, and a dash of salt. Stirring occasionally, cook until both are tender and broccoli is bright green. Add 1 more tbsp of oil if needed. The broccoli should be totally cooked through and tender, but should still have a slight crisp. Note: my favorite trick to cooking fibrous veggies, such as broccoli, without extra oil is to add a tbsp of water to the skillet. My mom taught me this.. Hi Mom! Stir continuously until water evaporates. Keep doing this until you've reached desired tenderness. Add an additional pinch of salt as well. • Once broccoli and cauliflower are tender, add cabbage, peppers, and carrots. Cook about 3-4 minutes, or until tender. Stir occasionally. • Add edamame and garlic and cook until garlic is fragrant • Pour half of your sauce over the veggies, then add the rice noodles and top with remaining sauce. Stir to combine and remove from heat. Garnish with sesame seeds and onions Shrimp: • Add marinade ingredients to a bowl, add shrimp, and toss. Let marinate for 10 minutes • Spray a large skillet or grill pan with non-stick cooking spray, and heat over medium high heat • Once hot, add shrimp and cook each side for 2-3 minutes, or until opaque and slightly pink Top your noodles with your shrimp (or dont!) and enjoy!! 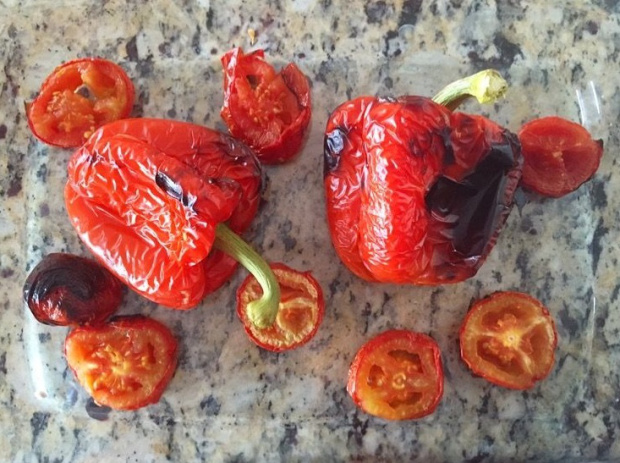 This concoction is a product of one of my famous freestyling kitchen binges (benders? psychotic breaks?). It has so many different flavors, textures, and antioxidants I could cry. The sauce is both creamy and acidic, and has that subtle sweetness you get when you roast vegetables. It balances out the heavier notes of the garlic and caramelized onions, and helps to perfectly incorporate the broccoli and kale, without being overpowering. I finished it off with a few sundried tomatoes to really build on that complex tomato flavor, and topped my bowl of pasta with a few kale chips for added texture. I don't mean to toot my own horn here but *drives down Lake Shore Drive honking at everyone on the road* 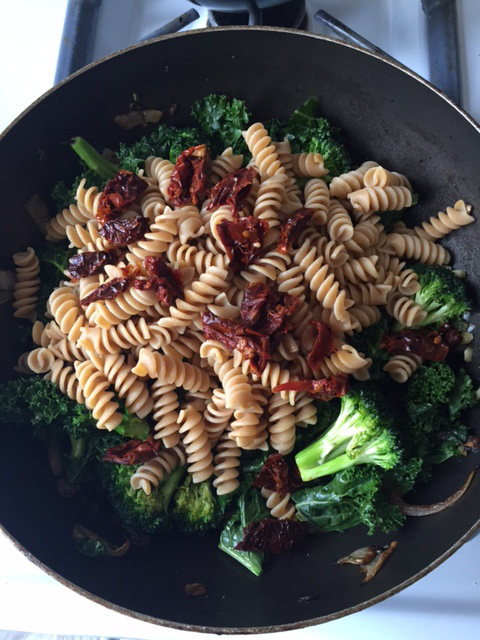 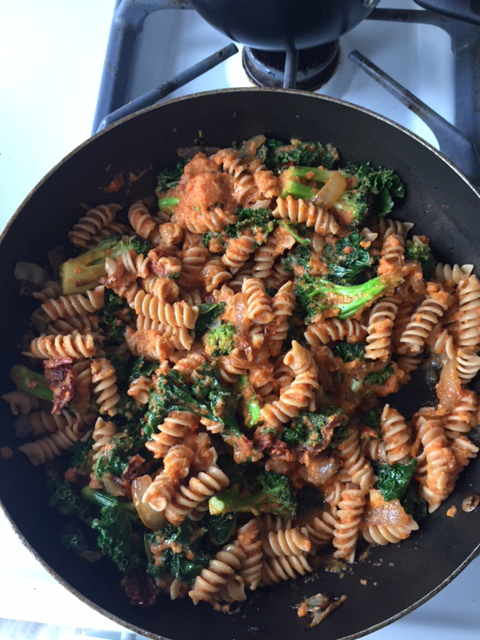 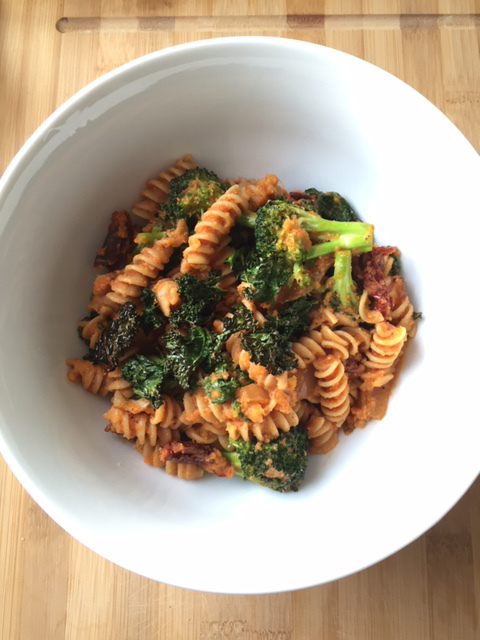 Ingredients (makes exactly 2 servings):
• Half box of whole grain rotini (about 6-7 oz) • Half small sweet onion, sliced • Half head of broccoli, cut into florets • Quarter head of cauliflower, cut into small florets • 1.5 cups of kale (de-stemmed and cut into bite sized pieces) plus a few extra leaves for the kale chip garnish (stemmed and cut into 1 inch pieces) • 3-4 sundried tomatoes, cut in quarters • 2 cloves garlic, diced • 1 red bell pepper • 1 cup of small tomatoes, halved (I used cherry, grape, and sunshine yellow cherry) • 3 tbsp olive oil • Cayenne powder • Cracked black pepper • Sea salt Directions: • Cook pasta according to package instructions. Save about 1/3 cup of the pasta water before draining • Preheat oven to 400 degrees • Place tomatoes and red pepper on lined baking sheet • Place cauliflower on separate lined baking sheet. Drizzle very slightly with olive oil • Bake toms/peps/caulis for about 10-15 minutes, rotating pepper halfway through Note: cauliflower will need more time to turn golden, so remove tomatoes and peppers first to avoid burning (hence the separate baking sheets) • While veggies are roasting, heat 1 tbsp of olive oil on medium high heat and add onions. Sprinkle with a pinch of salt and pepper and let caramelize until nice and golden brown (about 5-6 minutes) • Add broccoli and just a pinch more salt, sauté until bright green and tender • Add garlic and cook until fragrant, about a minute • Add kale and cook down until tender. Toss in sundried tomatoes, and remove skillet from heat • Once roasted, remove cauliflower, peppers, and tomatoes from oven. Let cool completely before removing stem and seeds of red bell pepper. Make sure to also peel off the black charred skins from the tomatoes and pepper. These are tough to chew and won’t blend into the sauce • Place your smaller cut leaves of kale on a baking sheet with a drizzle of olive oil, and let those bake for about 5 minutes in the oven until crispy. • Add roasted veggies to a blender or food processor and pulse to incorporate. Add your saved pasta water in small increments, and continue blending until smooth. Add in a drizzle of olive oil as well as salt, pepper, and cayenne to taste (taste before adding salt. your pasta water may be salty enough) • Add cooked pasta to the skillet with the broccoli/kale and pour sauce over top. Turn heat on low and stir to combine, allowing veggies, pasta, and sauce to heat through and giving all of the flavors a chance to marry..as they say • Scoop yourself a fat bowl, top with your baby kale chips, and enjoy!! I like to sprinkle on some red pepper flakes too :) 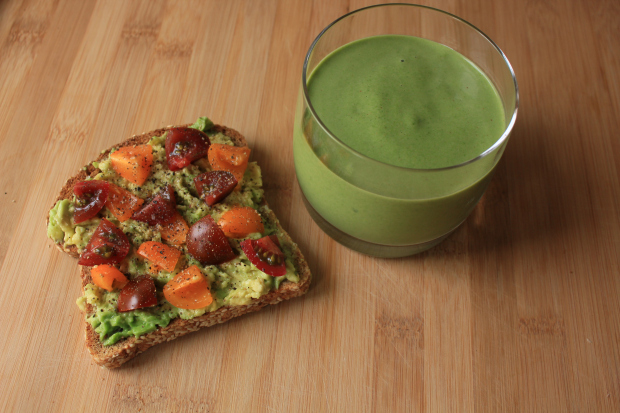 This smoothie, which is an amped up version of the tried and true PB/banana combo, is my go-to post-gym breakfast that keeps me full and glowing for hours. Because spinach is so mild, its’ flavor is easily masked, therefore making it my leafy-green smoothie addition of choice. I especially love using spinach in this smoothie, because it adds a lightness to an otherwise super creamy drink, and is also a great way to incorporate more greens into your diet. I like to use maca not only for its subtle malt-like taste (I’m Puerto Rican… I loooove malta), but also for its’ amazing benefits- it’s loaded with vitamins and minerals, and helps to increase energy (…and libido. ayo!)
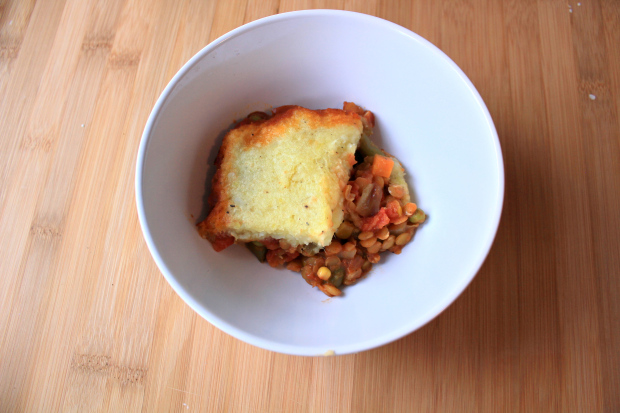
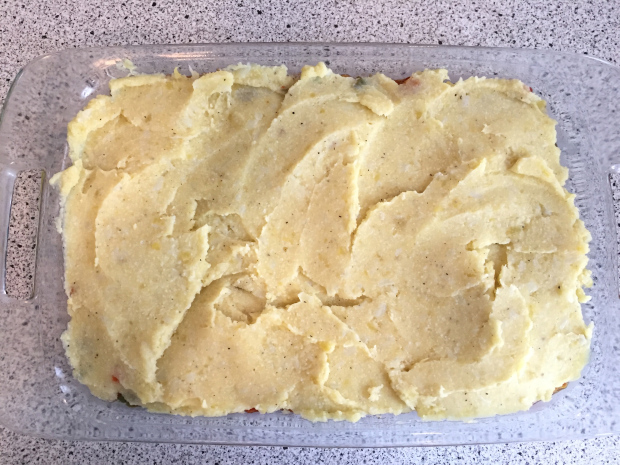
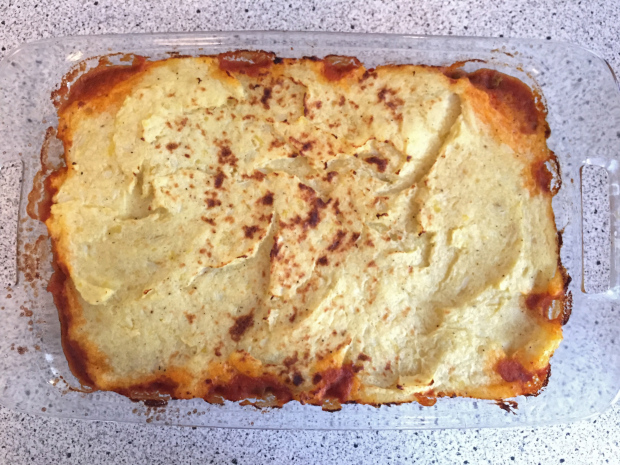
Ingredients: • 1 frozen banana • 1/3 cup frozen or 1/2 cup raw spinach • Almond milk (just enough to blend) • 2 tbsp creamy peanut butter • 2 tsp maca powder Directions (I don’t mean to question your intelligence by giving you smoothie blending instructions- I’ve just found this order of steps will give you the creamiest consistency): • Into a blender, add banana and a bit of almond milk. Blend until creamy • Add spinach, and a bit more almond milk (if needed). Blend until spinach is totally combined • Add peanut butter and maca powder. Blend until smooth Enjoy! Sterling moved to Chicago from Dallas in November of 2013. It snowed the day he got here, and continued to snow through the end of May. Yes, May. That January, we got down to -40º with the wind chill. Now, some of you tough guys may be thinking “that’s not thaaat bad” (which you are wrong), but we also lived next to the lake at the time…if you don’t know what lake effect cold is like, I am glad for you. That shit slices through your bones. So anyway, the day it hit negative 40, a pipe burst in our building, shutting off our hot water. Fortunately, my parents only lived about 30 minutes from us, so we drove to their house to shower, and returned home around 8 pm. Soon after settling on the couch, we noticed our vents were blowing out cold air. We called the building to find out that a second pipe had burst, subsequently eliminating our hot water AND heat. I remember we were standing in our bathroom with the door closed, in winter coats, blowing hot air on ourselves with my hair dryer. We got into bed (in full sweatsuits, with SOCKS, God help me), rolled ourselves into a 3 blanket burrito, said our potentially final “I love you’s” and prayed to see another day. Needless to say, we ended up making it through the night and lived to tell the tale. OH, I forgot to tell you the best part of the story….While this was all happening, we were on day 2 of a f*ckin JUICE CLEANSE!!!! So we’re over here cold, malnourished, and shaking, drinking kale and rationing off portions of raw, unsalted almonds- which I had to allow as a safety precaution. Lowkey I wanted to quit, but Sterling, the competitive D1 athlete that he is, decided we needed to finish the cleanse as a demonstration of “mental toughness.” Bless him. So anyway, we’ve had a VERY mild winter this year, especially compared to what we experienced a couple years ago, but it is still chilly and I do find myself craving a warm meal at night (followed always by froyo.. I cannot be tamed), and this one hit the spot. One of my favorite things to do is to find ways to take traditional meat-based recipes and create a vegetarian version that we can both eat. While no dish will ever taste like real meat, you can still create some really filling and satisfying meals that do taste amazing, and this vegan Shepherd’s Pie is one of them! 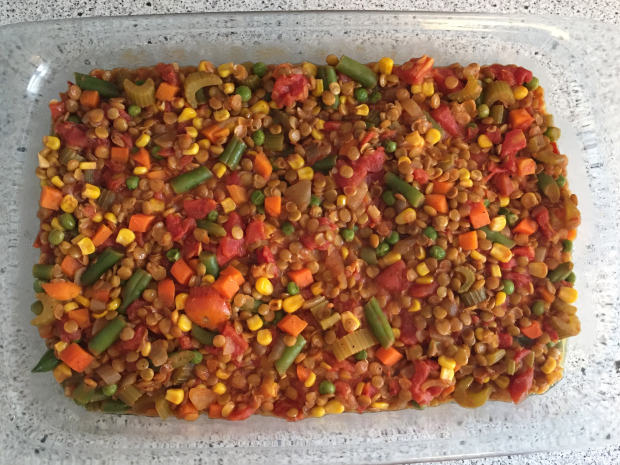 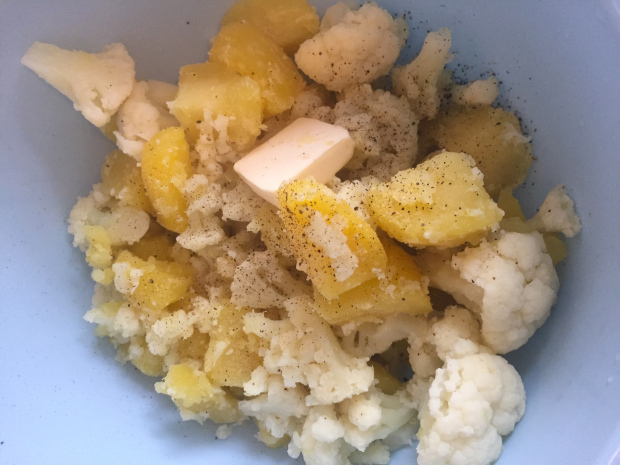 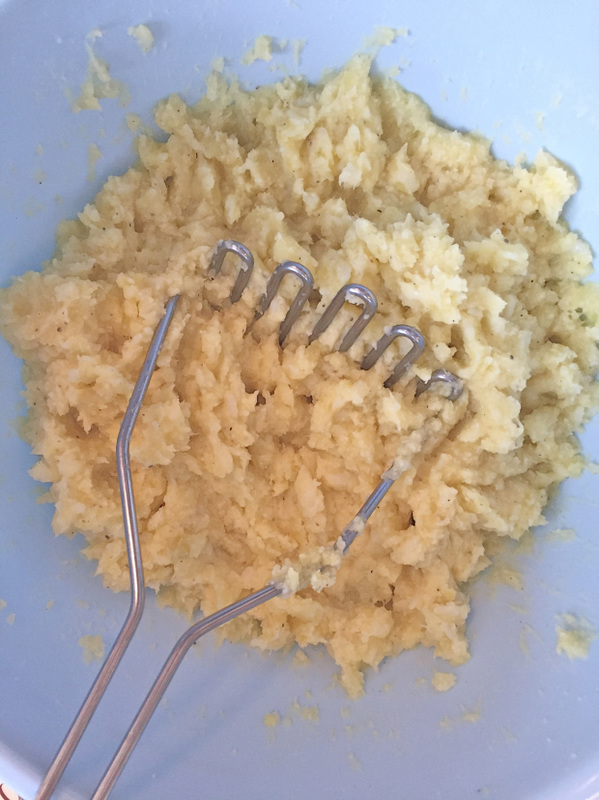 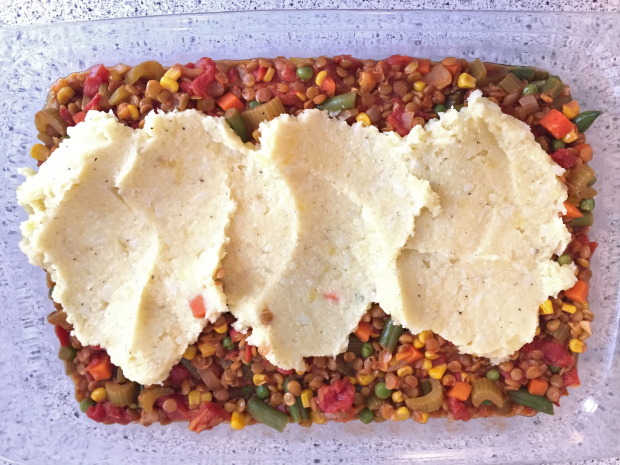
 Ingredients:
Filling: • 1 tbsp olive oil • 1 medium onion (diced) • 2-3 cloves garlic (minced) • 1.5 cups uncooked brown or green lentils (rinsed and drained) • 1 cup celery (chopped) • 1 (14 oz) can diced tomatoes • 1 (10 oz) bag of frozen mixed veggies: peas, carrots, green beans, corn Note: Green beans and corn are not used in traditional Shepherd’s Pie. I actually only used these because my grocery store was out of solo frozen peas, so I just grabbed this bag. It does amp up the veggie content, which never bothers me, but feel free to omit of you want to stay more traditional. In that case, you’d use 2-3 chopped carrots and about a cup of peas. • 3 cups vegetable broth • 2 tsp dried thyme • 2-3 tsp paprika • 2-3 tsp ground cumin • 1 tsp garlic powder • 1/2 tsp ground black pepper • Salt to taste Mashed Cauliflower and Potato Topping • 4 small yukon potatoes (peeled and quartered) • Half of a large head of cauliflower (cut into florets) • 2 tbsp vegan butter (I use Earth Balance) Note: you can obviously use regular butter if you want. I just wanted to keep the whole thing vegan. Note: no, I am not vegan actually • 1 tsp garlic powder • 1/2 tsp ground black pepper • Salt to taste Directions: • Heat oil in a large, non-stick skillet • Add onions and celery, and sauté until tender • Add canned tomatoes, lentils, veggie broth, thyme, paprika, cumin, garlic powder, and pepper. Bring to a boil then reduce heat and let simmer until lentils are tender (about 20 minutes, give or take). If lentils are still firm, add more water or veggie broth in 1/4 cup increments until tender Note: DO NOT ADD SALT AT THIS STAGE. When added to raw lentils, salt actually makes them firm up. Add salt AFTER lentils have cooked • While lentils are cooking, preheat oven to 400 degrees. Add potatoes and cauliflower to a pot of salted water. Bring to a boil, then reduce heat and let simmer for 14 minutes. Drain and add to a large mixing bowl. Add butter, garlic powder, salt and pepper, and mash until smooth. • Once lentils have cooked, add your frozen veggies and mix to incorporate. Let simmer for about 3-5 minutes or until veggies are heated through • Add lentil mixture to a greased 9×13″ dish and spread the potato/cauliflower mixture over top. Bake for about 15 minutes, or until topping has slightly browned and mixture is bubbling Enjoy! 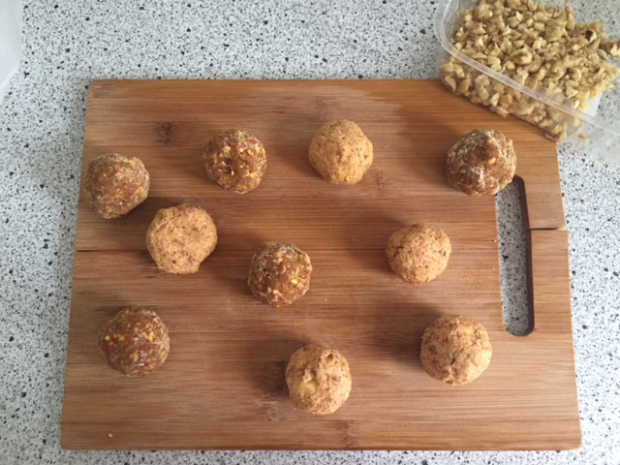 These lil snack bites will give you a boost of energy before the gym, or tide you over until dinner (hanger helper), or just generally satisfy a little sweet tooth without being over indulgent. These are date/nut based, and the way you flavor them is totally up to you. The good thing about these is that you can really do whatever you want with them, depending on what you have on hand. Here I made two versions: Goji and Maca (darker ones) and Carrot Cake. Once you’re done just pop them in the fridge and snack at your leisure!
Directions: Place all ingredients in a food processor, and pulse for a minute or two, or until the ingredients have all broken down into a crumbly, sticky consistency. If it’s just not sticking, add more dates. If it’s too sticky, add more nuts or flax. Once ready, take out small amounts and form a ball with your hands. Ingredients: Carrot Cake • 10 pitted dates • 1/3 C walnuts • 1-4 carrots, depending on thickness. (I used 4 super thin carrots. Start with less and add to your liking) •1-2 tbsp ground flax seed (this works as a binding agent..carrots are v wet) Goji and Maca • 10-15 pitted dates (you need more dates with this one. the dry goji berries are harder to blend) • 1/3 cup cashews • 1/3 cup dried goji berries • 2 tbsp Maca powder *Blend all ingredients first, then roll balls in the Maca powder. 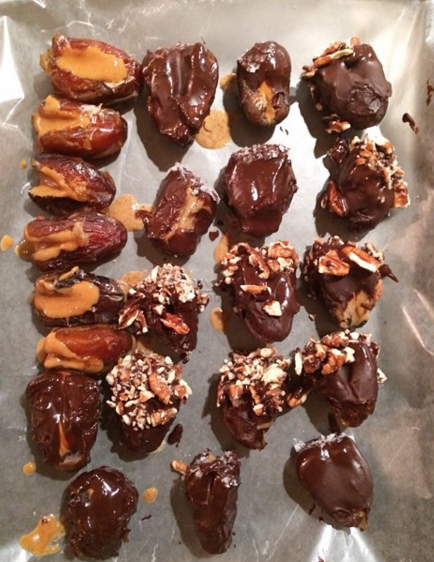 Almond Butter; PB and Chocolate; Chocolate, Almond Butter and Pecans; Chocolate, PB, and Sea Salt Is there anything in the damn world better than making something that takes no effort or skill and tastes like the angels from heaven above hand crafted a decadent dessert for you and you only? No, there’s not. Please make these. These are SOOOOOO good. This is for your own benefit. I feel like dates get a really bad rap, which I don’t approve of, but I truly think this dessert will change your mind(/life). These are peanut butter filled and chocolate covered. In this context, the dates take on this caramel quality that make these so rich and decadent and delicious. I made these with a friend and we both screamed after the first bite. Ingredients: • About 1 lb of large medjool dates (pitted) • 3 oz dark chocolate (the darker the better) • 1/2 cup nut butter of choice Optional toppings: Coarse sea salt About 1/3 cup chopped nuts (I used pecans) Directions: • Stuff each date with a heaping teaspoon of nut butter. Place in fridge to set. • Add a shallow amount of water to small sauce pan and bring to a simmer. Stack a glass bowl snugly on top of the pot, and add chocolate to the bowl. Stir chocolate as it begins to melt. Note: make sure the water does not touch the base of your bowl. this will make the chocolate seize up. Note: you could also melt your chocolate in the microwave, but that's less crafty and fun. with this option, microwave for 30 seconds, then stir, then microwave for another 30 seconds and stir. • Dip dates in melted chocolate, and thoroughly coat all sides. • Lick chocolate off fingers • Garnish with nuts and salt. I made a few different combos highlighted in the photo above. • Return to fridge for 10-15 minutes to set ENJOYYYYY |

Hi! I'm Shantal.
Categories
All
|

 RSS Feed