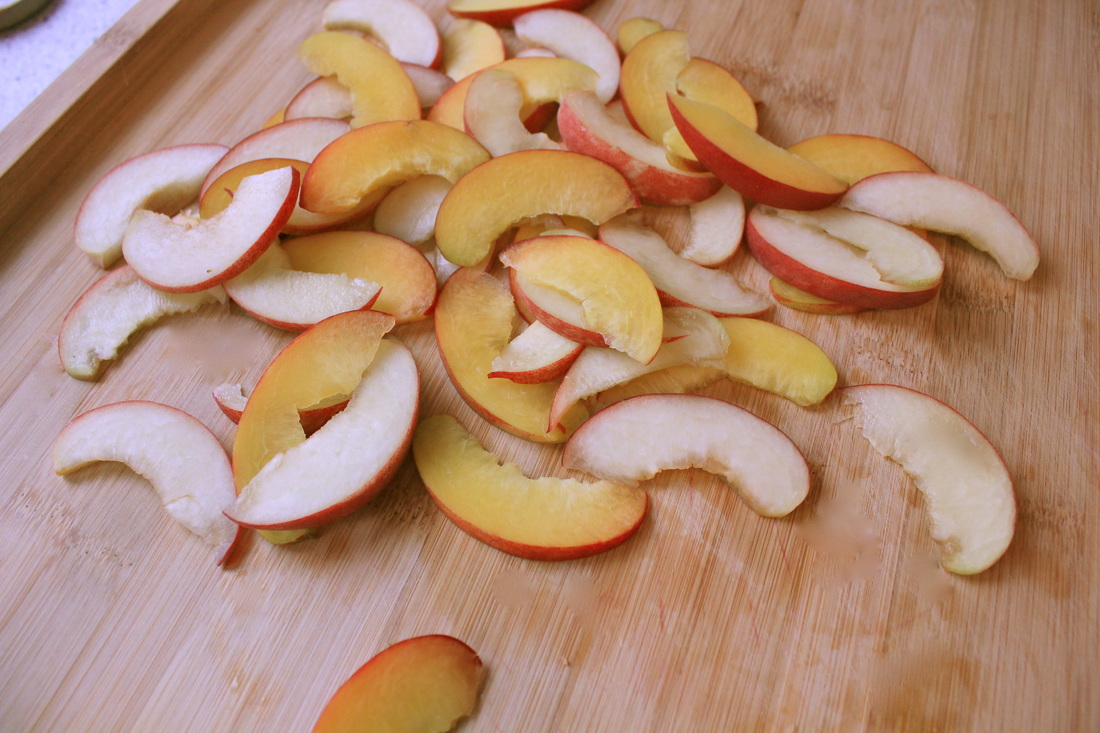
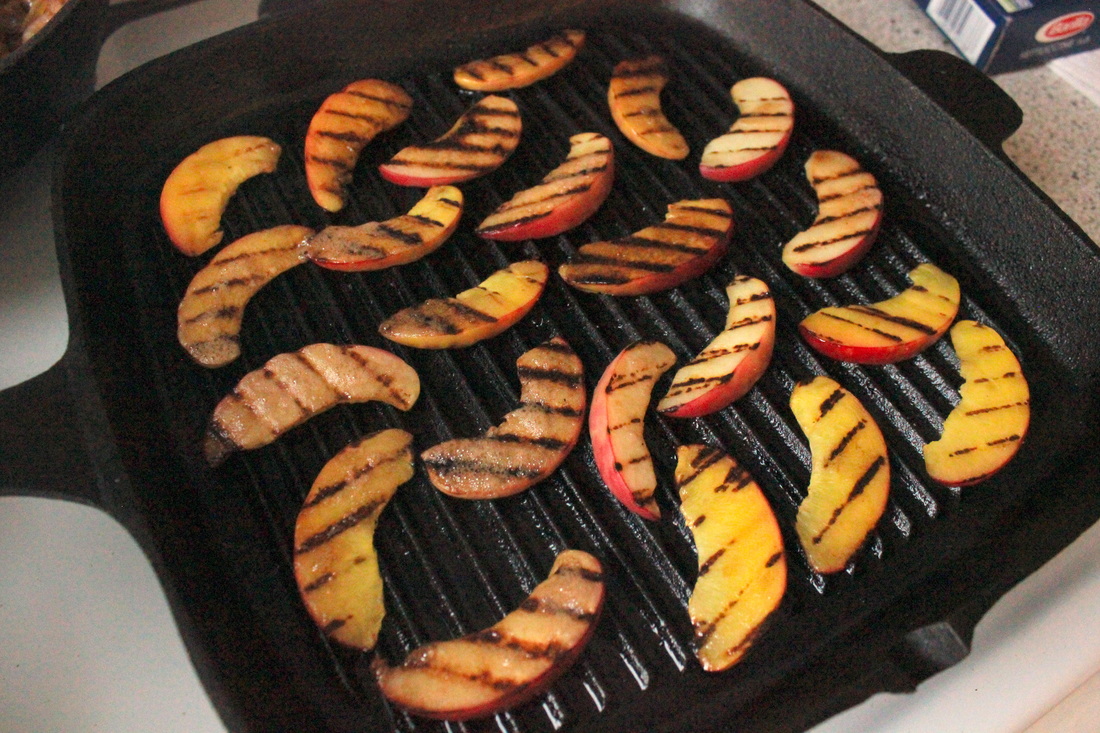
   My girlfriend Julian came over for dinner last night. We drank red wine, listened to jazz, watched a movie, and had a feast. On the menu was this amazing grilled peach flatbread with whipped honey ricotta and basil. I'll let you take a minute to reflect. This honestly might be one of my favorite things I've ever made.
Every single component is wildly delicious. The naan is perfectly crisp with a chewy center. The peaches are sweet and tart with a beautiful char. The ricotta...my god, the ricotta. It's light, and creamy, with just a hint of sweetness. I had some leftover and straight up ate it by the spoonful as I assembled the flatbread. I actually have a little bit more in the fridge that I'm about to spread onto some toast. And finally, the basil helps to balance out the richness, and adds beautiful color, making this the most scrumptious little bite of heaven. Ingredients: • Flatbread of choice (I used this naan flatbread) • 1 cup ricotta • 1.5 tbsp honey • 2 small peaches, sliced very thinly (I used 1 yellow and 1 white fleshed) • 2-3 tbsp chopped fresh basil • Pinch of salt Directions: • Preheat oven to 425 degrees and fit a baking rack over a baking sheet Note: If you don't have a baking rack, just lay your flatbreads directly onto a lined baking sheet. Using a baking rack will allow the heat to circulate under the flatbread, with helps cook everything more evenly, but this will still turn out great without one) • Heat a grill pan over high heat and spray with non-stick olive oil spray. Once hot, arrange peaches in one layer and grill for 2-3 minutes per side, or until each side has deep grill marks and the slices have softened, without becoming mushy. Remove from the pan and set aside. **before flipping the peaches, spray the uncooked tops with the olive oil spray, and sprinkle with salt, then flip and cook the other side • In a blender or food processor, blend the honey and ricotta until the ricotta is light and silky. This should just take a few pulses • Spread the ricotta mixture over the flatbread, stopping about half an inch from the edge, and top with the grilled peaches. Place onto baking rack and bake for 10-12 minutes, or until the edges are golden brown and crispy. Remove and top with chopped basil. Add back to the oven for about 30 seconds, to bake the basil into the peaches and ricotta. Quickly remove so that the basil doesn't burn. • Serve hot and enjoy!
1 Comment
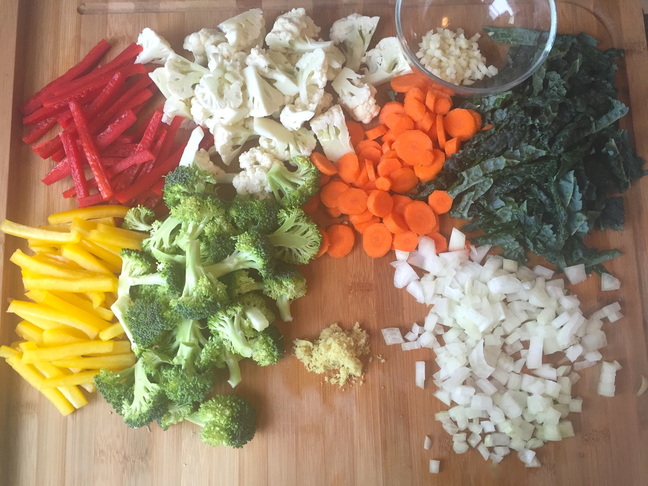 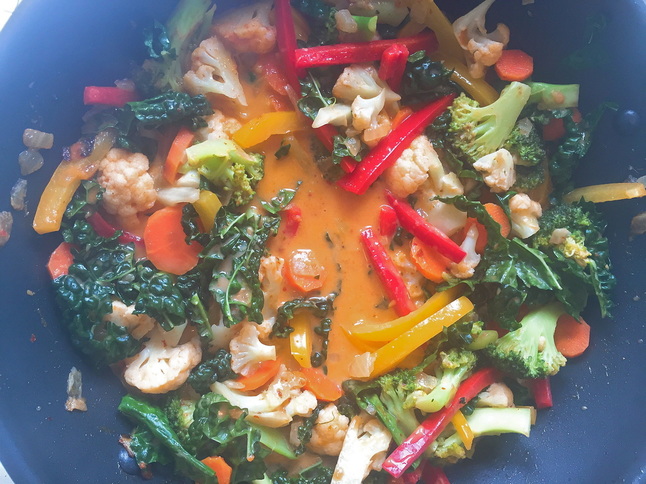 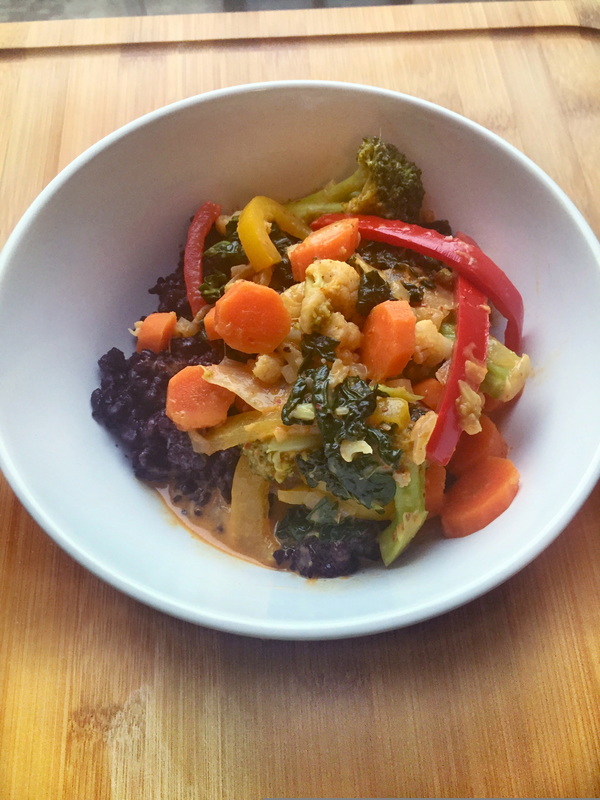 Warm and comforting, hearty and healthy. Mostly savory, but a little sweet and a little spicy. It's everything you need, really. I made this as an extension of Cookie & Kate's recipe, and it was delicious. I added some heat, a few extra veggies (I post way too much broccoli on this blog), and served it on top of a big bed of black rice- which allegedly contains more antioxidants than blueberries, fun fact. Another fun fact, I cannot make rice to save my life. It's always either over cooked or under cooked. My mom actually bought me a rice cooker for Christmas- it's that bad. Sterling can attest. So, if you want to learn how to make rice, please google it, because I really just cannot help you, I'm sorry. The rice you see up top turned out pretty good, but that was a fluke and I don't trust myself to tell you how to replicate the process. So sorry, love you forever.
Anyway! If you want to make this with meat, just add chicken to the pan before adding the veggies, cook until outsides are browned, but not cook through. Then proceed according to the rest of the instructions and let simmer until chicken is cooked through. Or, if you don't eat meat, and want to share this meal with someone who does, just make the chicken in a separate pan by sautéing bite sized pieces in some garlic and curry paste. Top the veggie curry with the chicken and your dinner guest will be good to go! Ingredients (makes approx. 4 servings): • 1 cup rice of choice • 1-2 tbsp coconut or olive oil • 1 small white onion (diced) • 1 tbsp freshly grated ginger (or the tubed kind!) • 1 cloves garlic (minced) • 1 red bell pepper (sliced in thin strips) • 1 yellow bell pepper (sliced in thin strips) • 3 carrots (peeled and sliced diagonally into 1/4" rounds) • 1 cup broccoli florets • 1/2 cup cauliflower florets • 1 cup lacinato kale (cut into thin strips, ribs removed) • 3 tbsp Thai red curry paste (I strongly recommend using this brand) • 14 oz full-fat coconut milk (there are several brands of coconut milk with lots of additives. the only ingredients you should see are: coconut, water, and guar gum) • 2 tsp coconut sugar • 2 1/2 tsp low sodium soy sauce • 1 1/2 tsp rice vinegar • 1/2 tbsp ground red pepper • Basil for garnish (strongly suggested! didn't have on hand when I created this post) Directions: • Cook rice according to instructions from someone else (see note in first paragraph of post) • Heat a large skillet with deep sides over medium heat. Once hot, add 1 tbsp of oil, onions, and a pinch of salt. Cook until onions are translucent, about 3-4 minutes. Add garlic and ginger, and cook until fragrant, about 1 minute. Stir continuously. • Add 2 tbsp of the curry paste and stir to combine. Cook for about 30 seconds, allowing the paste to soften up and become fragrant. Note: if cooking with chicken, you would add the meat at this stage and cook until browned, but not cooked through, then add veggies and follow remaining steps, allowing broth to simmer until chicken is fully cooked • Add broccoli and cauliflower and cook until veggies are tender and broccoli is bright green. The broccoli should still have a slight crisp to it. You may need an additional tbsp of oil. • Add peppers and carrots, and cook for about 3 minutes, or until tender, stirring occasionally. • Add remaining tbsp of curry and stir to combine • Add coconut milk, 1/4 cup water, kale, and coconut sugar, and stir to combine. Adjust heat to bring liquid to a low simmer, and cook for 5-10 minutes, allowing all of the flavors to come together. Note: if you are using canned coconut milk, there will most likely be a thick layer of coconut cream on top. Just blend this into the coconut water at the bottom of the can before adding to the curry. • Remove from heat and add rice vinegar, soy sauce, ground red pepper, and a pinch more salt (if needed) 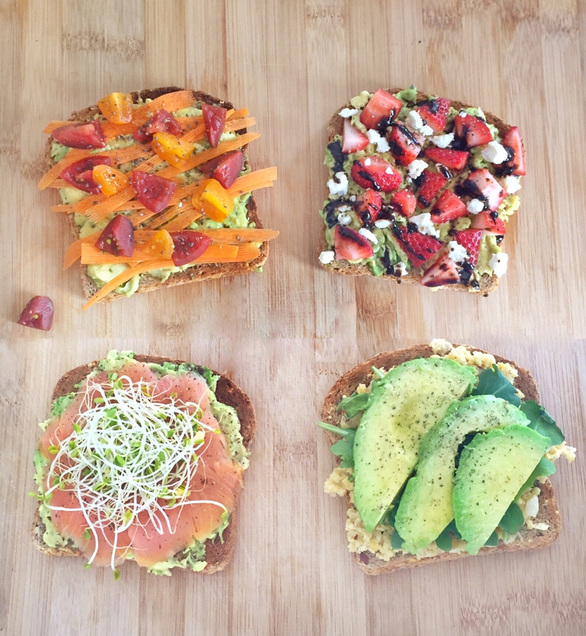 From top left, clockwise: TOMATO, CARROT, CHIA STRAWBERRY, FETA, BALSAMIC GLAZE CHICKPEA SMASH and ARUGULA SMOKED SALMON and SPROUTS I love playing with textures, colors, and flavors when I make avocado toast. My daily breakfast is almost invariably a smoothie with a slice of avocado toast, so I like to switch it up to keep it interesting. Of these 4, my hands down FAVORITE is the strawberry version. The tart strawberries with the creamy avocado, salty feta cheese, and sweet balsamic reduction is out. of. this. world. Don't knock it 'til you try it, kids. What you need: Tomato/Carrot/Chia Quarter avocado, mashed 2 cherry tomatoes, cut into quarters and then halved 1 carrot, thinly shaved (you can use a potato peeler) Coarse sea salt and fresh cracked black pepper to taste Optional toppings: sprinkle of chia seeds, dash of red pepper flakes Strawberry/Feta/Balsamic Glaze Quarter avocado, mashed 3 strawberries, cut into quarters and then halved Sprinkle of feta cheese Drizzle of balsamic reduction Sea salt and fresh cracked black pepper to taste (trust me on the pepper) Chickpea Smash/Arugula Quarter avocado, sliced Quarter cup canned chickpeas (drained, rinsed, and mashed) Drizzle of olive oil, pinch of sea salt, 1-2 tsp of lemon juice (add to chickpeas before mashing) Small handful of arugula Fresh cracked black pepper to taste Optional toppings: dash of red pepper flakes (on top of chickpeas, under arugula. It's just better this way.) Smoked Salmon/Sprouts Half an avocado, mashed 2-3 thin slices of smoked salmon Small handful of sprouts of choice No salt, salmon is salty on its' own. Just fresh cracked black pepper to taste (season both the avocado and the salmon). The bread: As my queen Ina Garten would say, use a really good bread. My favorite is Food for Life's Ezekiel Bread. I love their 7 Sprouted Grains and Sesame Sprouted the most. But if you don't have really good bread, any bread will do. Rice cakes are also GREAT. *Kitchen Tip* Have you ever noticed how the expiration date on bread is usually within 2 weeks from the day you bought it? And that you NEVER finish the full loaf before it gets stale? Well, did you know that bread keeps PERFECTLY in the freezer? When you're ready to eat, just pluck a slice from the loaf and let it either sit on the counter for 10 or so minutes until it hits room temperature, or simply pop it in the microwave for 10-15 seconds. You'll finally have bread that lasts long enough that you can actually finish it! Save ya money, honey. 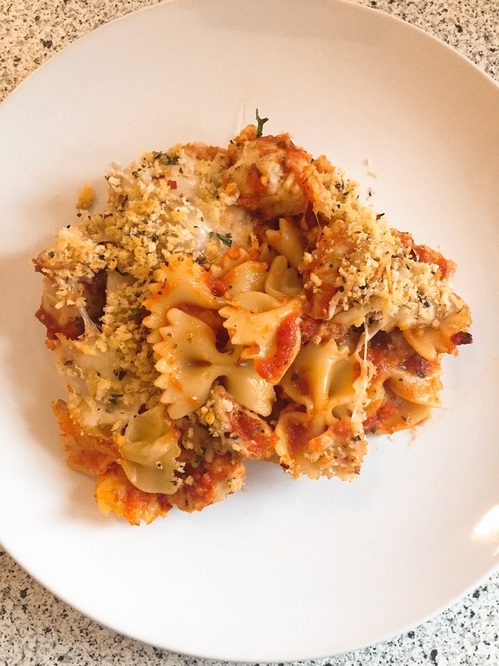 Continuing with the weeknight dinner thing, this is a quick meal that I swear by when I want to make something good, but really don't feel like cooking. I'm sure you have those nights too, so keep this one in your arsenal! Chicken parm is often served with spaghetti, so I love the idea of cutting out the extra steps and just preparing the whole meal together. This pasta is cheesy and crumbly, and highlights all of the flavors of chicken parm, all in one little dish. Best part- it takes about 30 minutes to make, and because you'll be poaching the chicken, requires very minimal hands-on time. I like to poach the chicken because it keeps the meat super tender... And requires little effort. To round out the meal, I like to serve this with a side of vegetables, like sautéed garlic green beans. As a side note, I have actually always preferred eggplant parm to chicken parm, and I think this would be SO great as a vegetarian version. I'll try it with eggplant sometime and let you know how it goes. Or YOU can make it and let ME know how it goes... Morgan M., I'm lookin at you, girl. 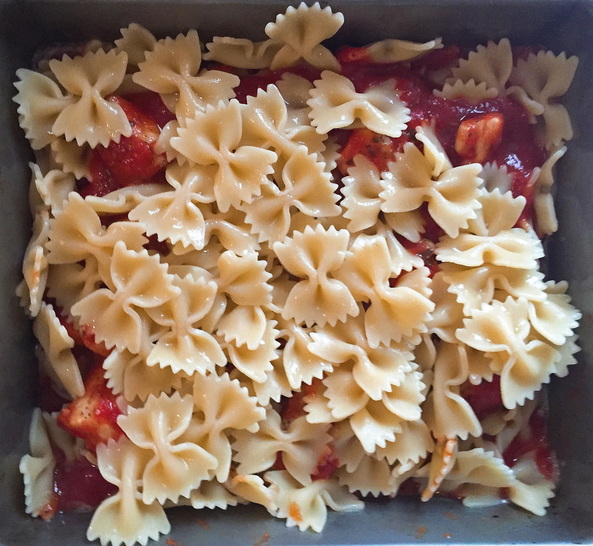 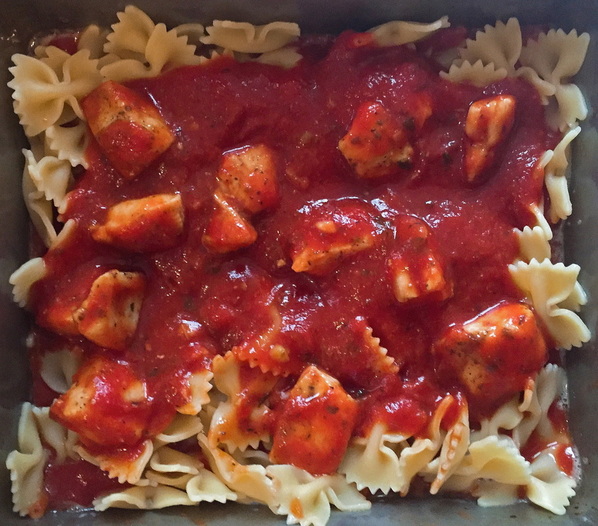 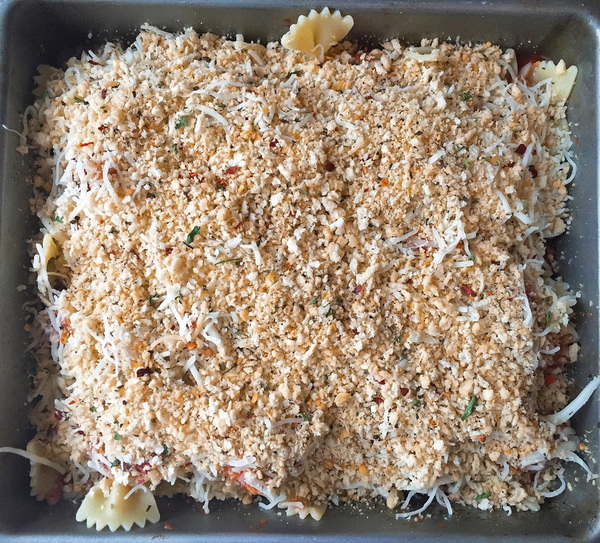 before baking 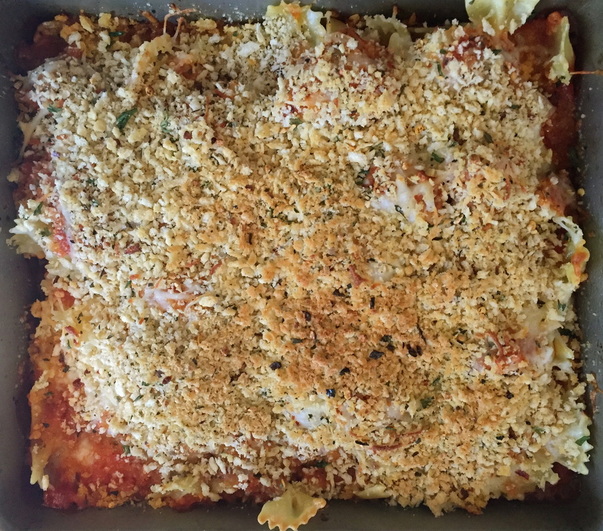 after baking 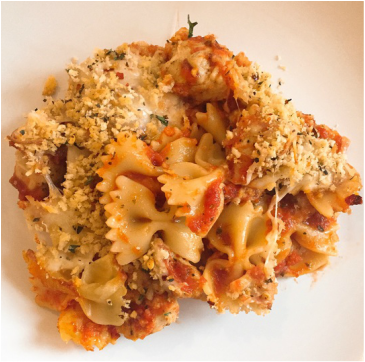 Ingredients (makes approx. 3-4 servings): • 8 oz pasta (penne is my preference, because you get a little burst of sauce with each bite. Bowtie is what I had on hand, and is a great substitute) • 1 large chicken breast • 1 garlic clove (gently smashed) • 24 oz marina (my favorite to use is this spinach and parmesan flavor) • 1/3 cup Italian panko breadcrumbs • 1/4 tsp dried basil • 1/4 tsp garlic powder • 1/4 tsp dried oregano • 1/2 cup shredded cheese (I like a mix of mozzarella and 6 blend Italian) • Salt • Ground black pepper and cracked black pepper to taste Directions: • Preheat oven to 375° and grease an 8"x10" dish. • Rinse chicken breast under cold water and place in a small saucepan with your garlic and 1/2 tsp of salt. Add cool water to the pot, covering the chicken by about an inch. Bring water to a boil, then reduce heat to a simmer and cover. Cook chicken for about 10 minutes, or until opaque through the middle. Note: chicken will need more or less time depending on thickness. Smaller cuts will need about 9 minutes, larger could go up to 14. • While chicken cooks, bring a pot of salted water to a boil. Add pasta, and cook for ten minutes. • Add panko breadcrumbs, basil, garlic powder, and oregano to a small bowl. Stir to combine. (Yes, I knowwww this is already Italian flavored, but adding more herbs and seasoning just kicks the flavor up a notch, and flavor is what we're all about here at Trilla's Table) • Once chicken has cooked, remove from the water, let cool, and then cut into bite sized pieces. Season both sides with a pinch of black pepper. • Building in layers, add half of the pasta to your baking dish, then half of the chicken, half of the marina, and a generous sprinkling of cheese. Give the dish a little shake to help the marinara reach all of the pasta, then repeat these steps with the remaining half. Top with the panko breadcrumb mixture. Note: I like to taste the marinara first to see if it needs any more seasoning. Feel free to add more seasonings or herbs to your liking. I usually add cracked black pepper, garlic powder, and basil. • Bake for about 15-20 minutes, or until breadcrumbs are golden brown. 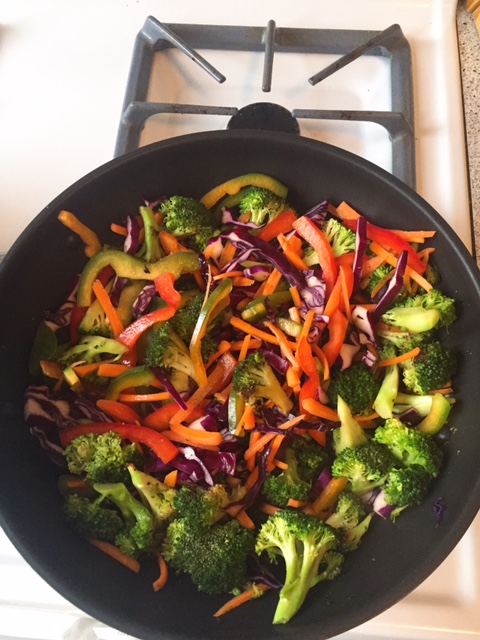 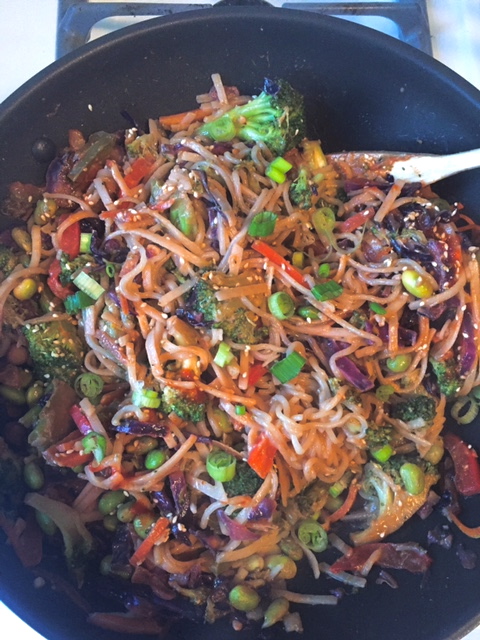 Stir fry is one of my favorite week night dinners to make. It's quick, easy, healthy, and a great way to use up almost any leftover veggies you've got in the fridge. I'd say the two keys to making a good stir fry are 1) keeping just the right amount of crispiness in the veggies, and 2) the SAUCE. After experimenting with dozens of stir fry sauces, I can confidently say that THIS one is perfection. It's creamy, savory, and bright, with a hint of spice. After adding it to the noodles, I can usually be found scraping the remaining sauce out of the bowl and spooning it into my mouth. No judgment.
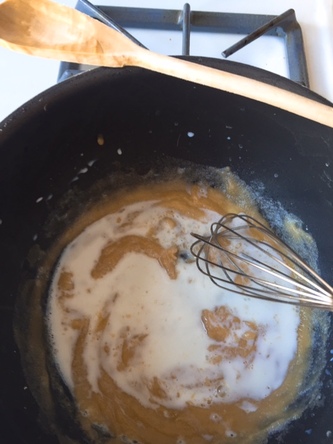
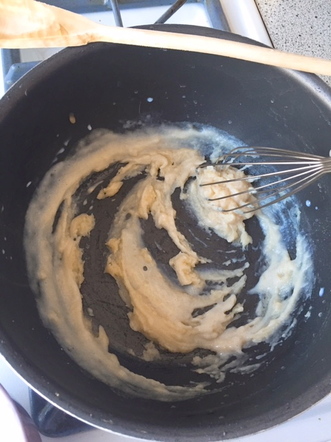
This stir fry also goes well with shrimp (if you're into that, which I am not, but Sterling is), so I'll give you the ingredients for the quick marinade I like to make for the shrimp, and how to prepare them. This is my ultimate number one favorite stir fry that I've made to date. It's so colorful, vibrant, quick to make, and deeelicious. I think it'll be your favorite too. Ingredients (makes approx. 4 servings): Noodles: • 10 oz stir fry rice noodles (I like this kind from Thai Kitchen) • 1-2 tbsp coconut or olive oil • 1 heaping cup broccoli (cut into florets) • 1/2 cup cauliflower (cut into florets) • 1/2 cup red cabbage (sliced) • Half large red bell pepper (sliced) • Half large green or yellow bell pepper (sliced) • 3 large carrots (julienned and cut into 1-2" slices) • 1/3 cup frozen edamame (thawed) • 2 cloves garlic (diced) Sauce (increase by 1 unit per ingredient if you like it mo' saucy) • 2 tbsp creamy peanut butter • 4 and 1/2 tbsp low sodium soy sauce • 2 tsp sesame oil • 1 tsp sriracha (or more, to taste) • Half tbsp fresh ground ginger (or the tubed kind) Shrimp I use the large frozen ones, shelled and deveined. Since I'm only ever making the shrimp for Sterling, I typically make like half a pound, give or take, so please adjust your marinade ingredients accordingly. In any case, you don't need a lot of marinade, just enough to mostly cover the shrimp. Marinade • 2-3 tbsp low sodium soy sauce • 1/2 tsp garlic powder • 1 tsp sriracha Optional toppings: Toasted sesame seeds Sliced green onions or scallions More sriracha Directions: Noodles: • Cook rice noodles according to package instructions, and prepare sauce (by whisking all sauce ingredients together) for later. • In a large skillet with deep sides (I use a small wok... That I own.....), heat 1 tbsp oil over medium high heat. Once hot, add broccoli, cauliflower, and a dash of salt. Stirring occasionally, cook until both are tender and broccoli is bright green. Add 1 more tbsp of oil if needed. The broccoli should be totally cooked through and tender, but should still have a slight crisp. Note: my favorite trick to cooking fibrous veggies, such as broccoli, without extra oil is to add a tbsp of water to the skillet. My mom taught me this.. Hi Mom! Stir continuously until water evaporates. Keep doing this until you've reached desired tenderness. Add an additional pinch of salt as well. • Once broccoli and cauliflower are tender, add cabbage, peppers, and carrots. Cook about 3-4 minutes, or until tender. Stir occasionally. • Add edamame and garlic and cook until garlic is fragrant • Pour half of your sauce over the veggies, then add the rice noodles and top with remaining sauce. Stir to combine and remove from heat. Garnish with sesame seeds and onions Shrimp: • Add marinade ingredients to a bowl, add shrimp, and toss. Let marinate for 10 minutes • Spray a large skillet or grill pan with non-stick cooking spray, and heat over medium high heat • Once hot, add shrimp and cook each side for 2-3 minutes, or until opaque and slightly pink Top your noodles with your shrimp (or dont!) and enjoy!! Guys. This is my no-fail, go-to, melty mac & cheese. I make it for every holiday, so I guess it's become my "signature dish." I bake it in the oven just long enough that the top layer gets a little crispy and seals in all the oozing, gooey cheese underneath. Y'all all know you love mac & cheese, so I'm not gonna even try to sell this one to you. Just keep reading if you want to learn how to make perfect mac & cheese EVERY time. First, you gotta make a roux. This is what will make your mac & cheese niiice and rich and creamy. In a large sauce pan, melt your butter until it starts bubbling, then add in your flour and whisk vigorously to remove all clumps. 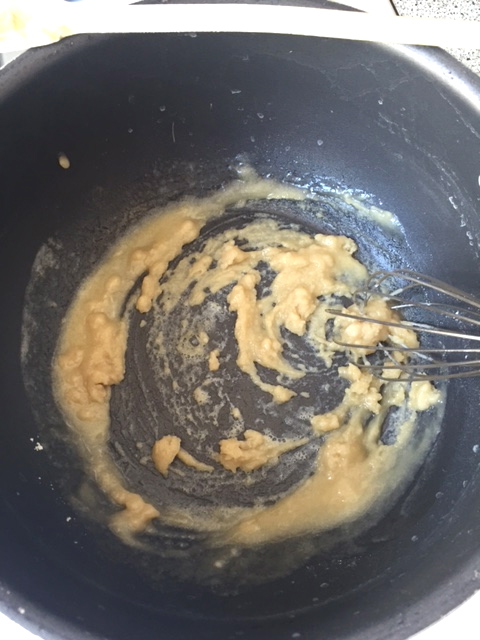 Once your flour is totally incorporated and has gotten nice and brown (a process that takes no more than a minute), you'll start whisking in your milk and cream. I like to add just a few tbsp at first, which makes it easier to blend. Whisk til smooth, then add the remaining milk and cream slowly, while whisking quickly and continuously.
Thennnn, you're gonna add the cheese. I like to use several different kinds. 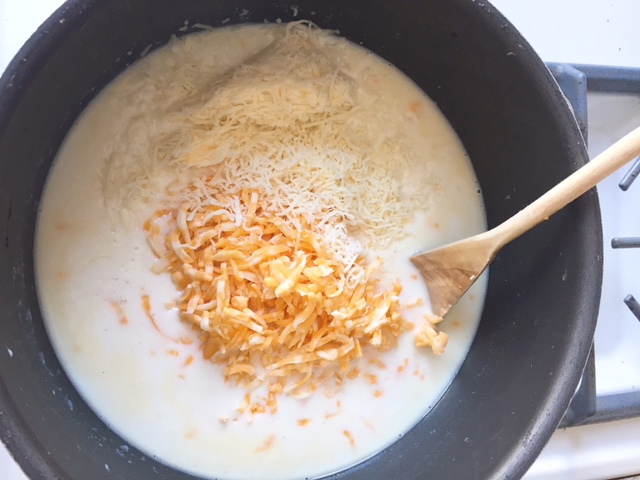 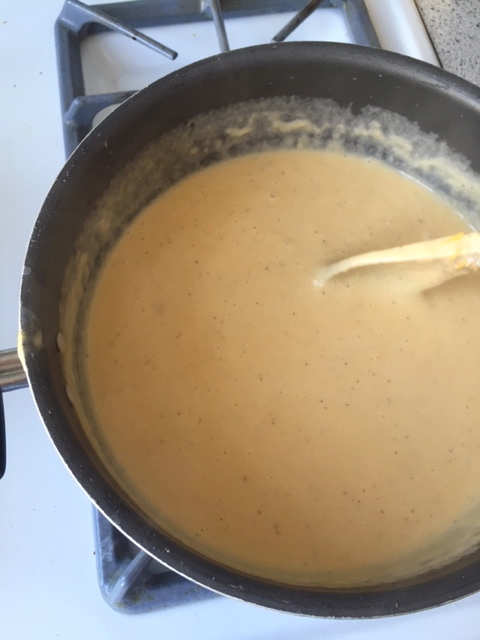 Once your cheese has melted and your sauce has thickened, you'll pour it over your pasta (which will already be waiting for you in a greased dish), and then pop it in the oven! While it cooks, your kitchen (or entire 1 bedroom apartment) will be filled with the intoxicating smell of warm, bubbly cheese. It is torture. Praying for you. But when it's done, you'll have this. A beautiful, crisp top layer covering miles and miles of melty cheese and pasta. Ugh. I just love it so much. 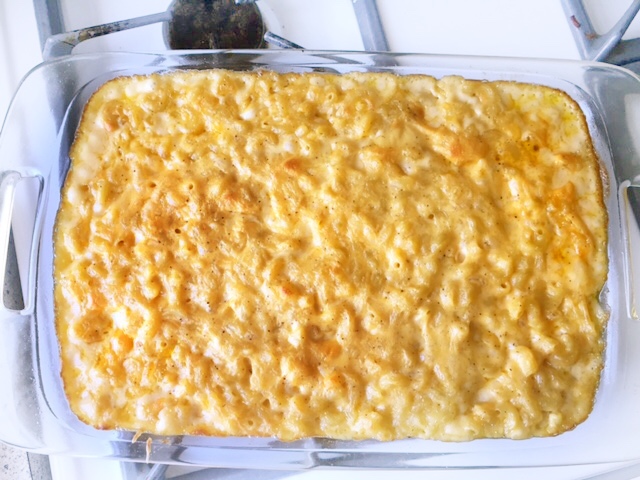 Ingredients (makes approx 4 servings. I usually triple this to serve 8-10 for holidays..shown above): • 1.5 cups elbow macaroni • 3 tbsp butter • 3 tbsp all purpose flour • 2 cups milk and half & half combined • 1/2 tsp salt (or more, to taste) • 1/2 tsp ground black pepper (or more, to taste) • ***secret ingredient*** 1/2 tsp mustard powder (trust me! it adds this bite that you just can't get with anything else) • 2 cups shredded cheese (I use cheddar, colby jack, and 6 blend Italian) Directions: • Preheat oven to 350 degrees, and bring a large pot of salted water to a boil. Cook pasta for 10 minutes (just under al dente). Once cooked, drain and transfer to a greased dish (about 8" x 10") • Over low/medium heat, melt butter • Add flour by the tbsp and whisk until totally incorporated. Let cook until browned and bubbly (no more than a minute) • Gradually pour in milk/cream and whisk continuously to avoid clumps • Add in your cheese, salt, pepper, and mustard powder, and stir to combine. Allow cheese to melt and sauce to thicken, stirring occasionally • Once thickened, *carefully* taste the sauce to make sure it's seasoned well, add more salt and pepper if necessary, and then pour sauce over pasta, and bake for about 25-30 minutes, until bubbling and golden brown That's all, folks! Note: you'll bake your mac & cheese for more or less time, depending on how deep your dish is. About 25-30 for a 2 inch dish. Note: feel free to manipulate the bake times depending on how funny you like your mac & cheese. I personally like mine a little firmer. This is Buzzfeed Tasty's Korean Style Ribs recipe. I try to only bring you guys recipes that I have either created myself or adapted from something else, but I needed to share this one with you. I followed the recipe exactly, and let me tell you, these. are. delicious. They take several hours to make, but only about 10-15 minutes hands-on time. Because I didn't modify this in any way, I'll give you my notes/suggestions throughout the recipe. Scroll down to read on! 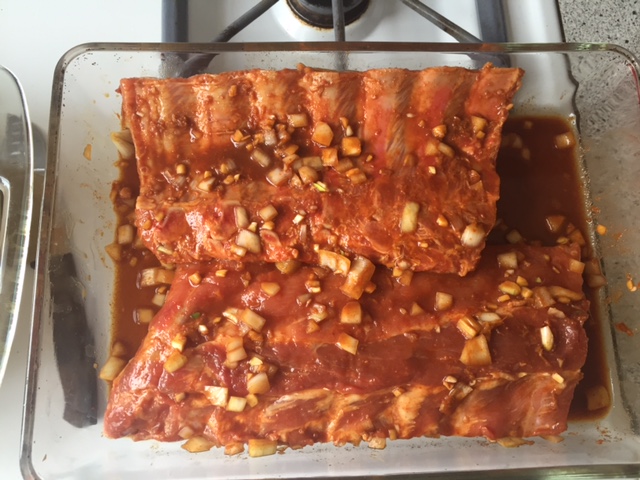 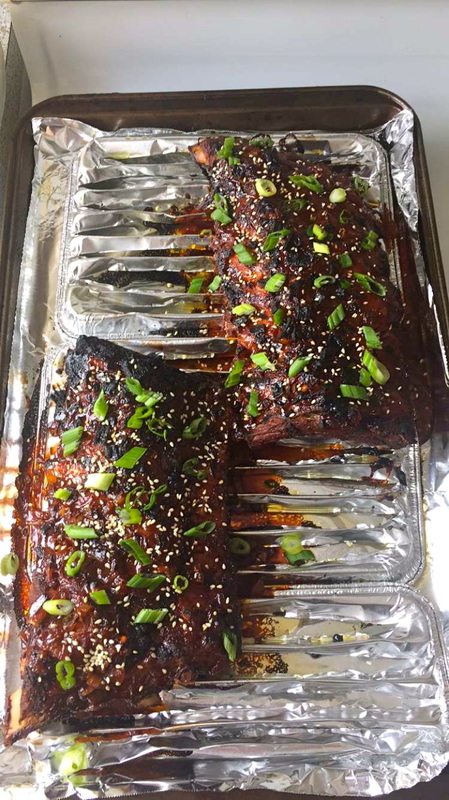 Ingredients:
• 1/2 cup soy sauce • 2 tbsp rice vinegar • 2 tbsp sesame oil • 2 tbsp red pepper powder • 8 garlic cloves (minced) • 1 tbsp grated ginger • 1 cup onions • 1/4 cup honey • 3 lbs baby back ribs (I used 2.85 lbs, and the meat to sauce ratio was perfect, tbh) Optional toppings: Sesame seeds Chopped scallions or green onions (I used green onions) Directions: • In a large bowl, combine soy sauce, rice vinegar, sesame oil, red pepper powder, garlic, ginger, and onions Note: red pepper powder is EXTREMELY spicy...that's coming from a Puerto Rican with a high tolerance for spice...There's enough meat in the ribs to offset the concentrated level of heat you're adding to the marinade, but if you are sensitive to spice, I would use either half the amount of red pepper powder OR substitute with cayenne • Add ribs to a large dish and pour the marinade over top, rubbing the sauce in with your fingers. Make sure to get both sides. Allow to marinate for at least four hours. Note: I prepped my ribs on Saturday evening, and let them marinate over night..total of about 16 hours. I think this makes a big difference as rib meat can be pretty tough. The longer you let them marinate, the more liquid the meat will absorb. • Preheat oven to 400° and place ribs on baking rack over a baking sheet. Save your marinade! Note: The baking rack was omitted in Tasty's version, but I'd strongly suggest using one. By creating a space between the ribs and the baking sheet, you allow the heat to circulate underneath, which helps cook all sides more evenly. If you don't have a baking sheet, like me, you can either... get one... or you can use a few of these foil broiler pans from Hefty (lmao). I just cut slits in between each of the ridges, and it worked like a peach. They're like 2 bucks for a set of 3. • Cook ribs for 2.5 to 3 hours and remove. Turn on broiler. Note: I put the ribs in before church, and got stuck in traffic on my way back, so they got the full 3 hours. I'd suggest keeping it at 2.5 • Once removed, add marinade and honey to a small sauce pan. Bring to a boil over medium/high heat, and continuously stir until you've formed a glaze. Spoon over your ribs and place under broiler for about 3 minutes, or until the glaze has caramelized Note: stay nearby. The original recipe suggested broiling for 5-10 minutes, but the glaze started burning right at the 3 minute mark • Top with sesame seeds and scallions or green onions, and serve while hot! |

Hi! I'm Shantal.
Categories
All
|

 RSS Feed