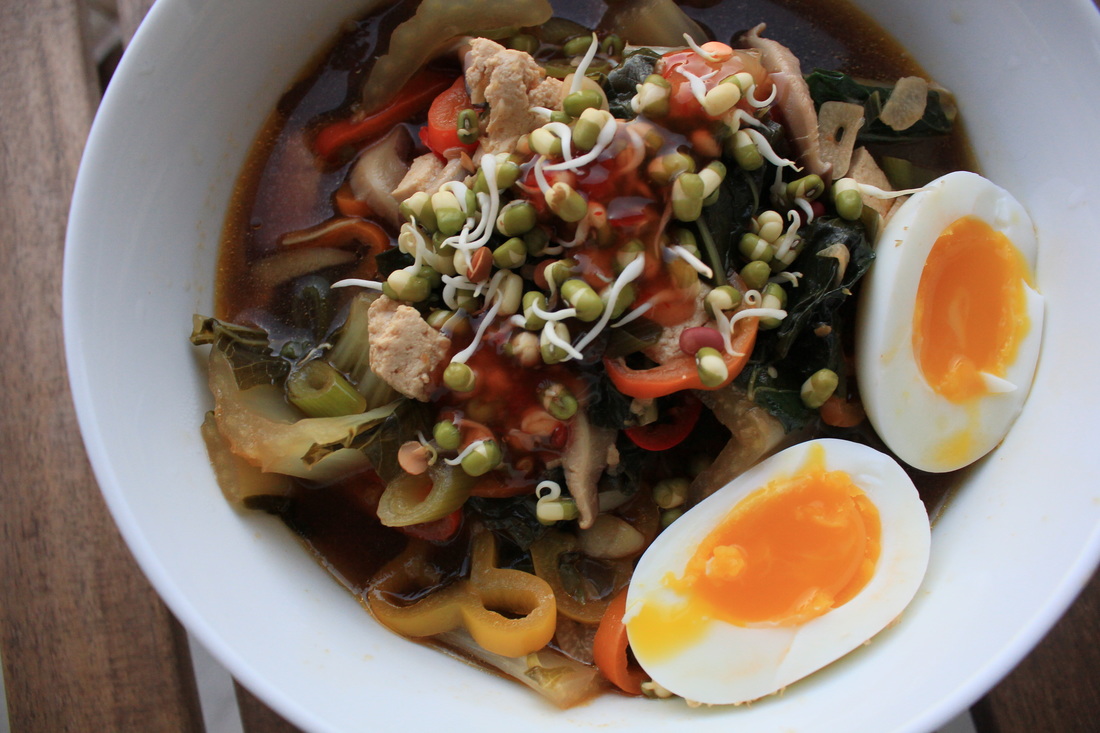
 I don't know if this will only resonate with my ~women out there~ but do you ever have those sore, achey, tired, and lazy days that just call for soup? Like only soup. Those days that are so long and trying that the only thing you can fathom doing after work is sitting on the couch and eating a big, warm, tasty, comforting, bowl of soup? Likewise, are you that kind of person who wants to indulge in emotional comfort eating but also get your greens in? If so, continue reading.
This ramen recipe is simple, straight forward, quick, and totally satisfying. It's also as customizable as you want it to be, which is my favorite kind of recipe. The final product is tasty, warming, and nourishing, and just as impressive as the restaurant version, even without the artistic presentation of the vegetables as it's normally served. That's why I call this "lazy" ramen- you're gonna kick it old school and just dump your soup into a bowl and enjoy. Click the link below to continue reading!
8 Comments
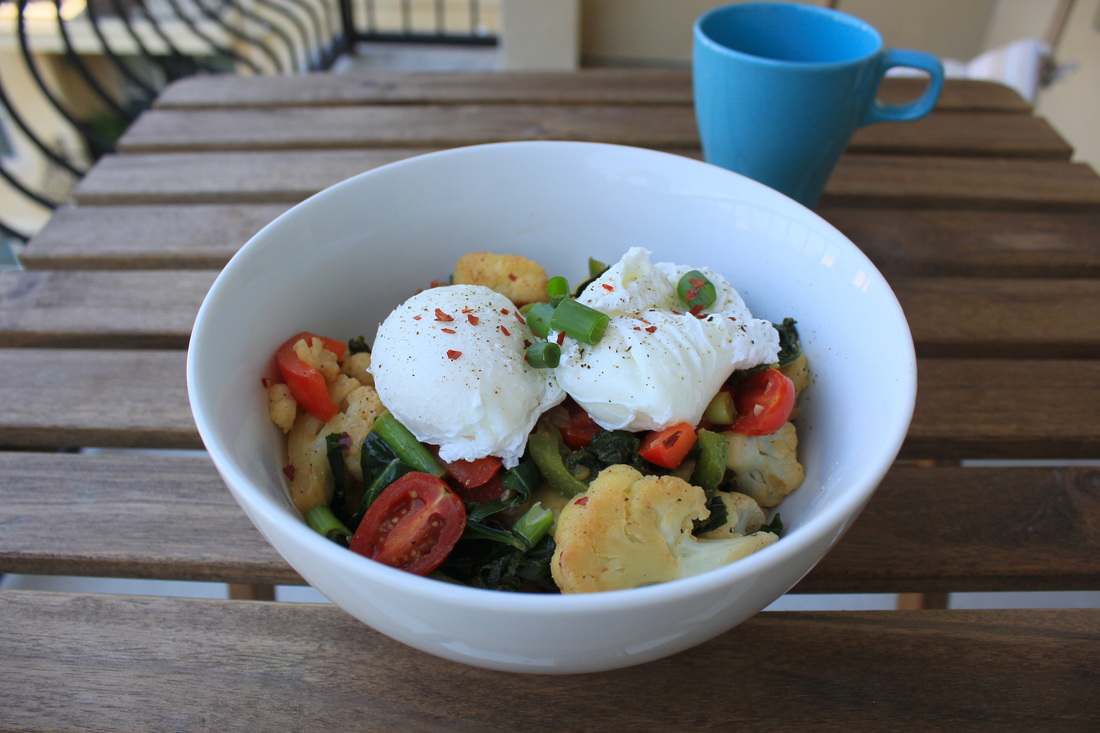 I feel like an angel when I eat this breakfast. It's so nutritious, filling, and satisfying that it keeps you feeling revitalized and full for hours. It's an awesome post-workout breakfast, but also a great hangover helper. The cauliflower does a good job of satisfying your meat and potato needs- it lends that hearty, carby quality I personally crave in a breakfast. Please note that the eggs are crucial here- the thick yolk gives the veggies a creamy and decadent texture. This breakfast is so so good... I shouldn't have to cook for free.
Serves: 1 Prep time: 5 minutes Cook time: 20 minutes Ingredients: • 2 eggs • 1/4 cup onions, sliced in half inch pieces • 3/4 cup red or green pepper, chopped in half-inch pieces • 1/2 cup cherry tomatoes, sliced vertically • 2 cups hearty greens (I used kale and collard greens), chopped • 2 cups cauliflower florets, in bite sized pieces • 2 tbsp green onion, chopped • 2 tsp rice vinegar • 1.5 tsp garlic powder • Crushed red pepper flakes • Salt and pepper to taste • Cracked black pepper (optional) • 1 tbsp olive oil Directions: For the veggies: • In a nonstick skillet or wok, heat half tbsp olive oil over medium high heat. Once hot, add onions and cook until they start to color (about 2 minutes), then season with salt and pepper and add cauliflower. Season with half tsp garlic powder and cook for 5-6 minutes, or until cauliflower are tender. Add more olive oil as needed. • Reduce heat to medium. Add greens and season with salt, pepper, and half tsp garlic powder. Continue cooking until greens have wilted and released most of their moisture (about 3 minutes). Season with 1 tsp rice vinegar and cook another minute. • Add peppers, and season with salt and pepper to taste. Cook another 3-4 minutes, or until peppers are tender, then add tomatoes. Season with remaining garlic powder, and salt and pepper to taste. Cook until tomatoes are tender. Like 2-3 min. • Add half of the green onions, stir, and turn off heat. For the poached eggs (this is my fool proof method): • While veggies are cooking, fill a small sauce pot with 2 inches of water. Pour egg into a small saucer and keep cold. • Bring the water to a gentle simmer over med-high heat (small bubbles should be rising to the top of the water, without actually causing the surface of the water to "roll" ya feel me?) • Once simmering, add 1 tsp each of rice vinegar (or white, if you don't have rice) and salt. With a spoon, quickly stir the water to create a cyclone. Pour the egg into the center of the cyclone, turn off the heat, cover the pot, and cook for 4 minutes and 45 seconds. Do not uncover until the time is up. Just trust the process, and me. Note: 4 min and 45 seconds will yield a thick and creamy, but runny yolk. less time will make a looser yolk, more time will make a firmer yolk. 'tis science. Another note: the vinegar helps to keep the egg whites together. vinegar is not necessarily crucial, but it is helpful. I use rice vinegar because it vaguely seasons the water. White vinegar is flavor neutral. • After desired cooking time, remove egg with a slotted spoon and place on a napkin to dry To assemble: Pour veggies into a bowl, top with poached eggs, season with freshly cracked black pepper, remaining green peppers, and crushed red pepper flakes to desired heat preference. Serve hot and enjoy! 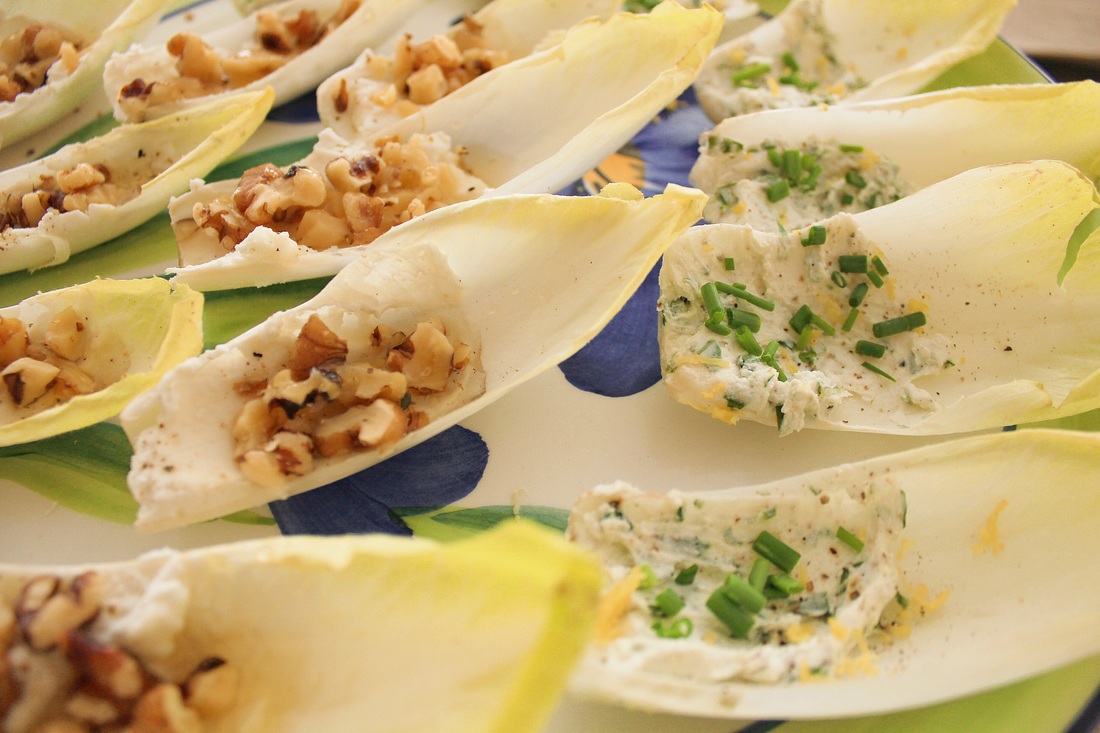 This is a simple, elegant looking app that's easy to whip up. I love a good cheese plate, but I thought this would be a fun and unique alternative. I've made two versions here- goat cheese, honey, and walnuts (creamy, crunchy, sweet) and herbed goat cheese, chives, and lemon zest (salty, savory, herbaceous). I'll never say "herbaceous" again, I promise. Anyway, I think the...herby... one would be GREAT with pomegranate, but allegedly they were out of season when I made these, womp womp.
You're just going to add portions to your liking, so I don't have a recipe with exact measurements for you, but here what you'll need. Ingredients: • 2 endives (will yield about 18-ish useable leaves) • 1-2 tbsp honey • A couple tbsp of chopped walnuts • About 3 leaves of fresh basil, finely chopped • About a tsp of garlic powder • About 1/4 tsp of dried oregano • About 3 fresh chives, chopped • Tbsp of fresh lemon juice, plus half tbsp of lemon zest • Sea salt, to taste • Cracked black pepper, to taste • 3-4 oz goat cheese Optional toppings: balsamic glaze (highly recommended!), pomegranate Directions: In a small bowl, mix half of your goat cheese with the basil, oregano, garlic powder, salt, and pepper Spread on half of your endive leaves, drizzle with lemon juice, and top with lemon zest. Add more salt and pepper, to taste. Take the remaining goat cheese and spread on the second half of your endive leaves. Top with salt, walnuts, and a drizzle of honey That's it! Keep cold until ready to serve. 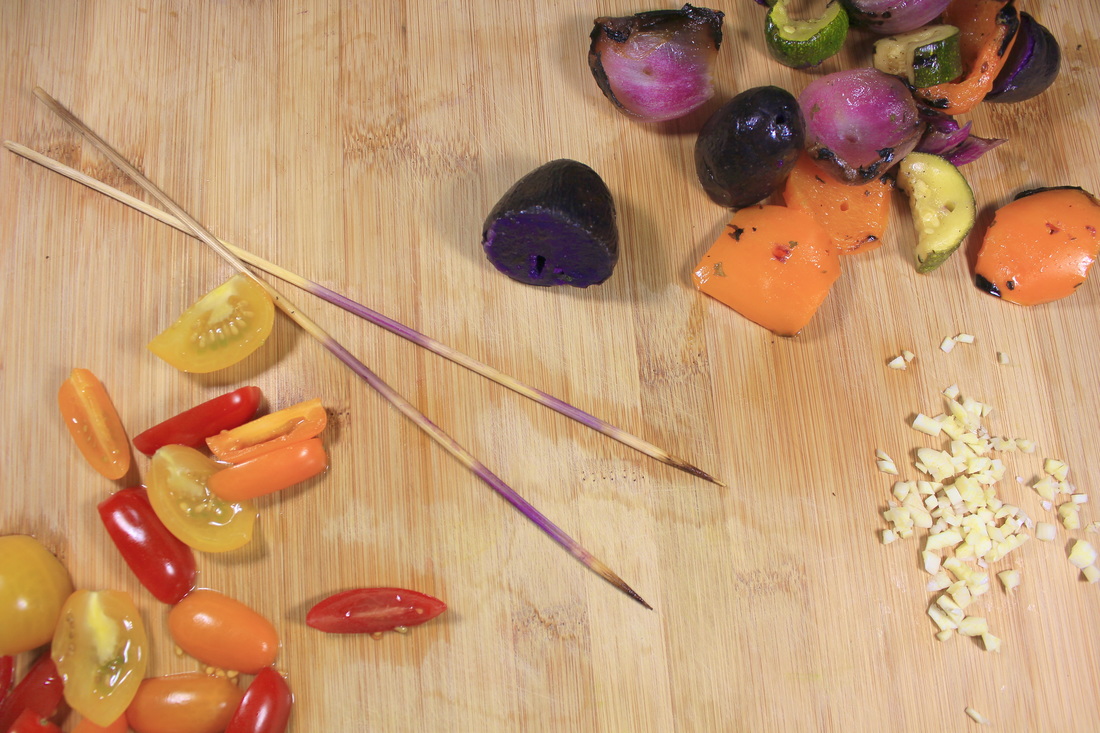 Hello from Atlanta!! As most of you know, Sterling and I moved from Chicago to ATL last week. He received a promotion (woop woop!) about 6 weeks ago, and it brought us here. I'll be doing a little blog post about the move in the next coming days... right now let's focus on the food. Memorial Day was this past Monday. Sterling grilled up some chicken, burgers, and hot dogs on the balcony, and I made mac & cheese, creamed corn, baked beans, and veggie kabobs. We had a few new friends over, drank a few drinks, ate a few plates of food, and lounged by the pool. Summer is approaching (allegedly it's not actually summer yet, although this Atlanta HEAT is telling me otherwise), which means cookout season is upon us. One of my new goals is to be more conservative with the amount of food I waste, striving to make meals solely with what I've got in the fridge and pantry. Back in Chicago, we were around the block from a grocery store, so I literally stopped in every day after work to pick up ingredients for dinner. It was expensive and wasteful. So, in the light of conserving food and embracing cook out season, I came up with this quick and easy pasta idea that uses leftover veggie kabobs. This may come as a surprise to you, but veggie kabobs are usually the last to go at a cookout, so there are usually plenty of skewered leftovers. Add 'em to some whole grain pasta with sautéed garlic and tomatoes, and you're good to go. It aint fancy, but it's delicious, quick, and practical. 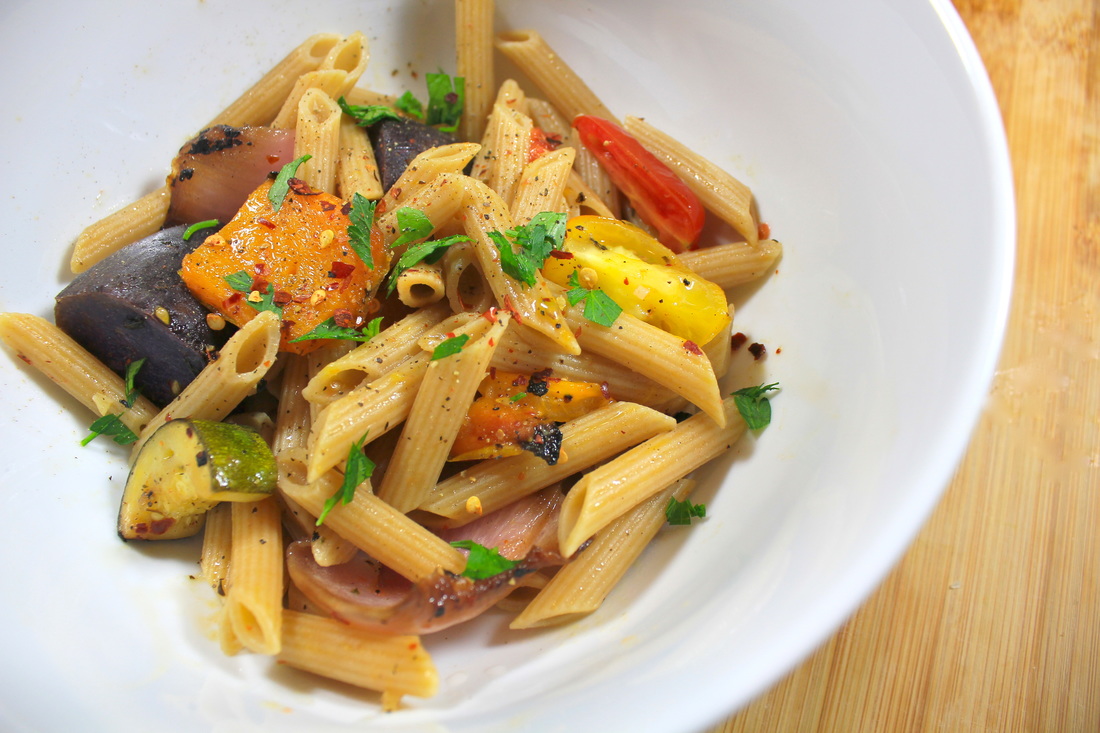 Serves: 2
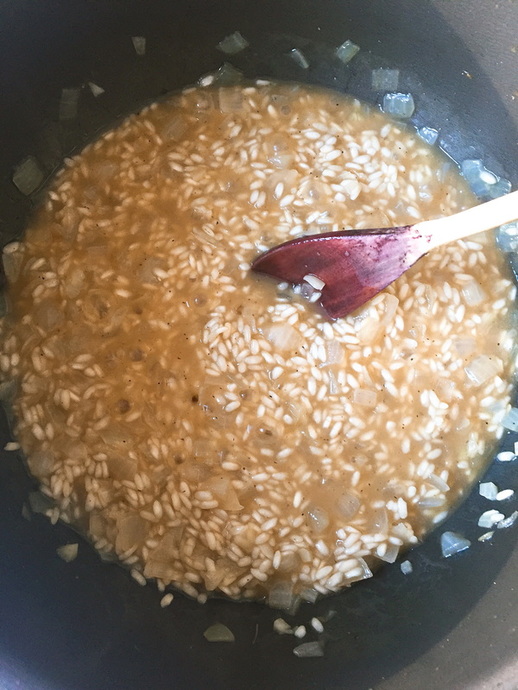
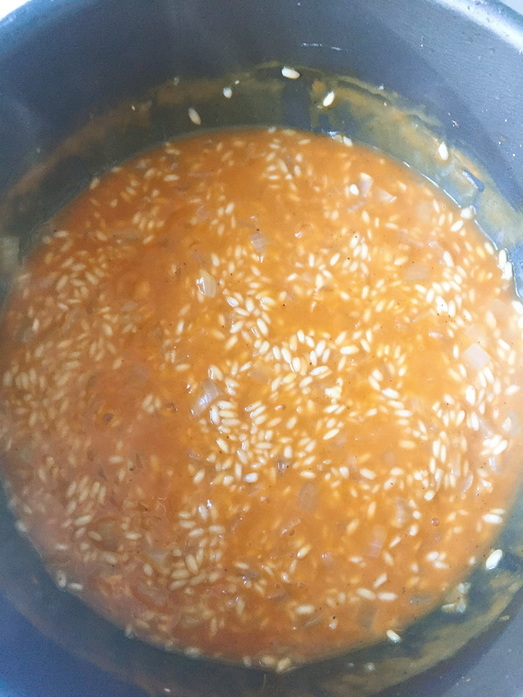
Cook time: 15 minutes Ingredients: • 8 oz whole grain pasta • 2 veggie kabobs, removed from skewers (should yield about 1 heaping cup of veggies) • 1 garlic clove, minced • 1/3 cup cherry tomatoes, quartered • Salt and cracked black pepper to taste • Quarter tsp garlic powder • Half tsp crushed red pepper flakes • 1-2 tbsp olive oil Optional toppings: chopped italian flat leaf parsley, basil, sun dried tomatoes Directions: • Cook pasta according to package instructions, drain and set aside • Heat 1 tbsp olive oil in skillet and add leftover veggies until heated through • Add garlic and crushed red pepper flakes. Cook until fragrant, about 1 minute • Add tomatoes, stir, and cook for another 1-2 minutes, until tomatoes have softened without becoming mushy • Stir in pasta, season with salt/pepper and garlic powder, and drizzle with remaining olive oil, as desired • Finish with optional toppings of choice and serve hot! 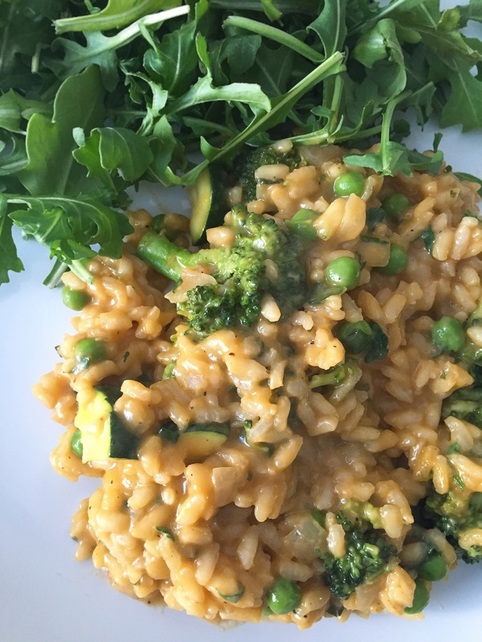 Yeah, you heard me. I said carrot purée. If you guys know me by now, you know I love sneaking in extra vegetables where I can. And if it adds more color, it's a win win. This risotto is rich, creamy, aromatic, and has just a hint of sweetness from the carrot purée. It pairs really nicely with a simply arugula salad (and a crisp glass of white wine), and is always impressive to guests. The only problem with risotto is that it doesn't really reheat that well, so you're just gonna have to finish this whole thing tonight :) A lot of people have this misconception that making risotto requires a higher level of skill, but honestly, it's one of the easiest things you can make- it just requires your near-undivided attention. I think the babysitting aspect of making risotto is what deters most people, but I find it to be extremely therapeutic. The heady scent of white wine and onions cooking together will fill your kitchen and make you feel fuzzy inside, and there is something so calming about the repetition of stirring and ladling, stirring and ladling, stirring and ladling.... see what I mean? *Kitchen Tip* I've found that the best way to make risotto is with a glass of wine in your free hand... ;) Have I mentioned I like wine? But really, you deserve it. You're going to be standing at the stove for an hour- treat yourself. 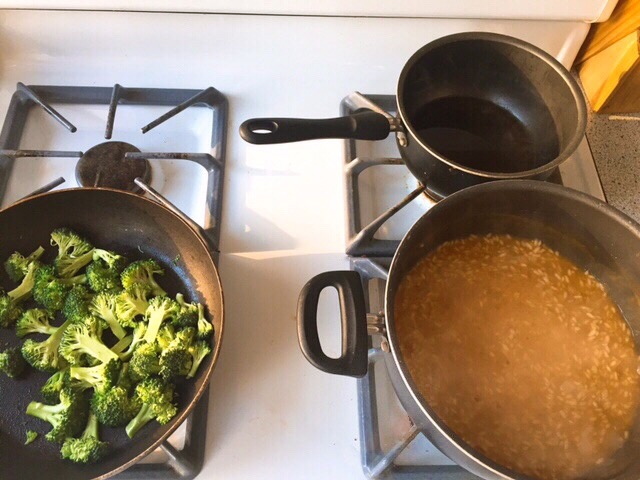 It's important to always keep your broth at the same temperature as the rice. As the rice continues to cook and absorb the broth, it will puff up and release its' starch, which is what gives risotto that signature creaminess. Adding liquid that is too cool will reduce the risotto's temperature, interrupting the cooking process and causing the risotto to cook unevenly.
 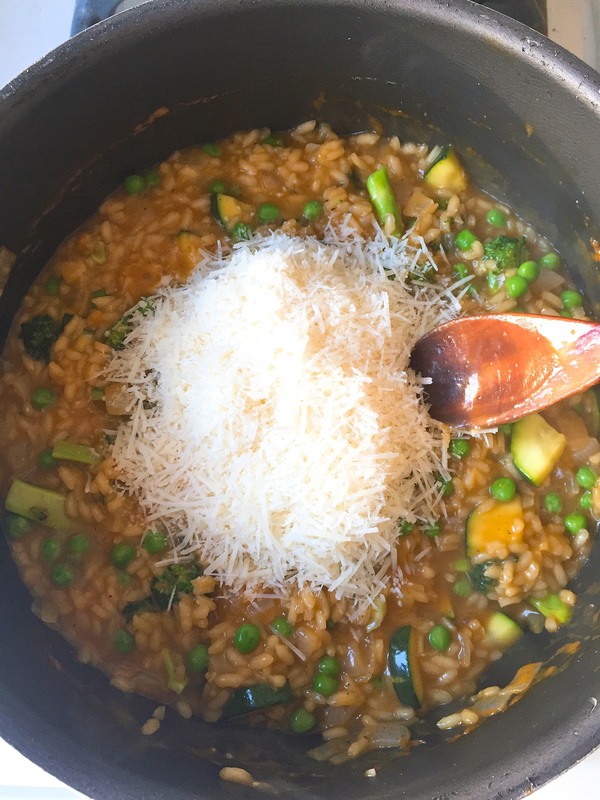 Ingredients:
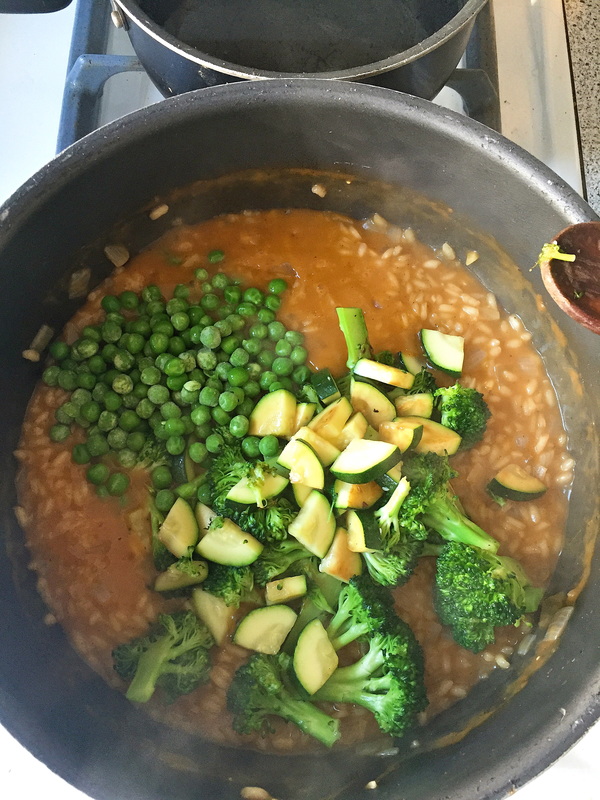
• 1 1/2 cups Arborio rice (uncooked) • 4 1/2 cups vegetable stock (in general the larger cartons of stock are about 32 oz. Feel free to use water for that last 1/2 cup) Note: you may need more or less broth • 1 cup white wine (plus more for you) • 1 small onion (chopped) • 3 garlic cloves • 3 tbsp butter • 4 carrots (chopped in large chunks) • 1/3 cup frozen sweet peas (thawed) • 1 cup of broccoli (cut into florets) • 1/3 cup zucchini (diced) • 1 cup grated parmesan • 1/4 cup flat leaf parsley (finely chopped) • 1 tbsp olive oil • Salt and cracked black pepper (to taste) Directions: **Be sure to have all ingredients measured out and chopped up before you start the risotto** • Start with your purée. Add carrots, water (just enough to cover the carrots), and a pinch of salt to a small saucepan. Bring to a boil and allow carrots to cook until tender. Saving the liquid, remove the carrots and add to a blender or food processor. Add about 1/4 cup of the cooking liquid and blend until smooth. Add about a tbsp of cooking liquid as necessary, until carrots have reached the right consistency. It should basically have the consistency of baby food- very smooth, but not too watery. Set aside when done. • Heat the broth in a small saucepan until the liquid starts steaming. Adjust heat as necessary to keep the liquid hot, without simmering, as you cook the risotto. • Over medium heat, melt the butter in a large pot. Add onions and cook down until translucent, about 4 minutes. Add salt, pepper, and garlic. Cook until fragrant, about one minute. • Add the rice, and give it a few stirs so that the butter covers all of the grains. Let the rice toast for about a minute, stirring occasionally. • Add wine, inhale the AROMA, and let cook until most of the liquid is absorbed. Note: throughout the duration of this process, you will be adding liquid and cooking down until most, not all, is absorbed. You always want a thin layer of liquid covering the rice. • Add a ladleful of broth (about 1/2 cup) and continue to stir occasionally until most of the liquid is absorbed. Continue to repeat this process until you've added half of your broth. • At this point, add in your carrot purée, and with that same method, stir occasionally until most of the liquid has been absorbed. Then return to ladling in the broth. Continue doing this until your risotto is creamy and al dente. • While your risotto is cooking, heat a tbsp of oil in a non-stick skillet. Add broccoli, with a pinch of salt, and sauté until bright green. Add zucchini and continue to sauté until tender. I like to get a little sear on the zucchini as well. Remove from heat and set aside. • Once risotto is done, add in your broccoli, zucchini, peas, and parsley. Stir to combine and cook for about a minute, allowing all of the flavors to come together. • Add parmesan and stir until cheese has melted • Season with more cracked black pepper. Taste before adding any extra salt- parm is salty on its' own Serve immediately! 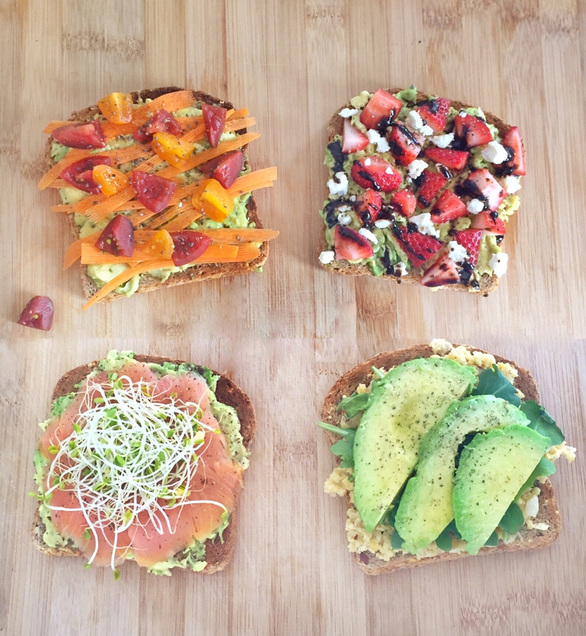 From top left, clockwise: TOMATO, CARROT, CHIA STRAWBERRY, FETA, BALSAMIC GLAZE CHICKPEA SMASH and ARUGULA SMOKED SALMON and SPROUTS I love playing with textures, colors, and flavors when I make avocado toast. My daily breakfast is almost invariably a smoothie with a slice of avocado toast, so I like to switch it up to keep it interesting. Of these 4, my hands down FAVORITE is the strawberry version. The tart strawberries with the creamy avocado, salty feta cheese, and sweet balsamic reduction is out. of. this. world. Don't knock it 'til you try it, kids. What you need: Tomato/Carrot/Chia Quarter avocado, mashed 2 cherry tomatoes, cut into quarters and then halved 1 carrot, thinly shaved (you can use a potato peeler) Coarse sea salt and fresh cracked black pepper to taste Optional toppings: sprinkle of chia seeds, dash of red pepper flakes Strawberry/Feta/Balsamic Glaze Quarter avocado, mashed 3 strawberries, cut into quarters and then halved Sprinkle of feta cheese Drizzle of balsamic reduction Sea salt and fresh cracked black pepper to taste (trust me on the pepper) Chickpea Smash/Arugula Quarter avocado, sliced Quarter cup canned chickpeas (drained, rinsed, and mashed) Drizzle of olive oil, pinch of sea salt, 1-2 tsp of lemon juice (add to chickpeas before mashing) Small handful of arugula Fresh cracked black pepper to taste Optional toppings: dash of red pepper flakes (on top of chickpeas, under arugula. It's just better this way.) Smoked Salmon/Sprouts Half an avocado, mashed 2-3 thin slices of smoked salmon Small handful of sprouts of choice No salt, salmon is salty on its' own. Just fresh cracked black pepper to taste (season both the avocado and the salmon). The bread: As my queen Ina Garten would say, use a really good bread. My favorite is Food for Life's Ezekiel Bread. I love their 7 Sprouted Grains and Sesame Sprouted the most. But if you don't have really good bread, any bread will do. Rice cakes are also GREAT. *Kitchen Tip* Have you ever noticed how the expiration date on bread is usually within 2 weeks from the day you bought it? And that you NEVER finish the full loaf before it gets stale? Well, did you know that bread keeps PERFECTLY in the freezer? When you're ready to eat, just pluck a slice from the loaf and let it either sit on the counter for 10 or so minutes until it hits room temperature, or simply pop it in the microwave for 10-15 seconds. You'll finally have bread that lasts long enough that you can actually finish it! Save ya money, honey. 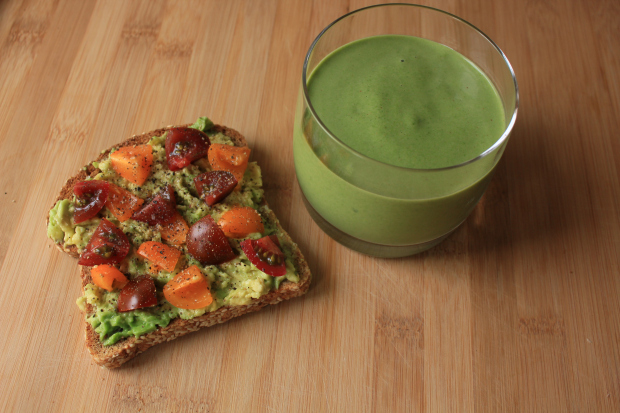 This smoothie, which is an amped up version of the tried and true PB/banana combo, is my go-to post-gym breakfast that keeps me full and glowing for hours. Because spinach is so mild, its’ flavor is easily masked, therefore making it my leafy-green smoothie addition of choice. I especially love using spinach in this smoothie, because it adds a lightness to an otherwise super creamy drink, and is also a great way to incorporate more greens into your diet. I like to use maca not only for its subtle malt-like taste (I’m Puerto Rican… I loooove malta), but also for its’ amazing benefits- it’s loaded with vitamins and minerals, and helps to increase energy (…and libido. ayo!)
Ingredients: • 1 frozen banana • 1/3 cup frozen or 1/2 cup raw spinach • Almond milk (just enough to blend) • 2 tbsp creamy peanut butter • 2 tsp maca powder Directions (I don’t mean to question your intelligence by giving you smoothie blending instructions- I’ve just found this order of steps will give you the creamiest consistency): • Into a blender, add banana and a bit of almond milk. Blend until creamy • Add spinach, and a bit more almond milk (if needed). Blend until spinach is totally combined • Add peanut butter and maca powder. Blend until smooth Enjoy! |

Hi! I'm Shantal.
Categories
All
|

 RSS Feed